Semantic Versioning in Azure DevOps Pipelines
Semantic versioning simplifies tracking changes in software by using a structured version format: MAJOR.MINOR.PATCH. It’s especially useful in Azure DevOps pipelines for managing build artifacts, ensuring traceability, and reducing deployment risks. Here's the core idea:
- MAJOR: Increment for breaking changes (e.g.,
1.4.2→2.0.0). - MINOR: Increment for new, backward-compatible features (e.g.,
1.4.2→1.5.0). - PATCH: Increment for bug fixes or small updates (e.g.,
1.4.2→1.4.3).
Using tools like GitVersion, semantic-release, or manual strategies, you can automate versioning in Azure DevOps. These tools analyze your Git history, commit messages, or pipeline variables to generate consistent versions. Proper configuration ensures every artifact - like Docker images, NuGet packages, or ARM templates - carries a clear version tied to your Git repository.
Key Takeaways:
- Why It Matters: Helps track builds, understand changes, and manage dependencies.
- How to Start: Use tools like GitVersion or semantic-release with Azure DevOps pipelines.
- Best Practices: Enforce structured commit messages (e.g., Conventional Commits), tag Git versions, and version all artifacts, including infrastructure code.
Semantic versioning ensures clarity and traceability in your CI/CD workflows, making deployments more predictable and manageable.
Semantic Versioning, Docker and Azure Devops
sbb-itb-79ce429
Planning a Semantic Versioning Strategy
Semantic Versioning Tools for Azure DevOps Pipelines: GitVersion vs semantic-release vs Alternatives
Define What to Version
Start by identifying all the artifacts that need versioning. This typically includes not just your application build but also any associated components.
In Azure DevOps projects, this often means versioning application binaries, Docker images, NuGet packages, and npm packages. If your project relies on Infrastructure as Code (IaC), don’t overlook versioning for ARM templates (using the contentVersion field), Bicep files, and Terraform modules [1][3]. Microsoft emphasizes this in their documentation:
"In Universal Packages, a particular package is identified by its name and version number. Currently, Universal Packages require Semantic Versioning." [5]
Skipping IaC versioning is a common mistake. When deployments fail, having a versioned infrastructure allows you to pinpoint the issue to a specific version, not just the application build. Once you’ve identified all artifacts, make sure your versioning strategy aligns with your Git workflow.
Branching and Release Flow
Your versioning approach should work hand-in-hand with your Git workflow, ensuring that the type of branch dictates how the version increments.
| Branch Type | Typical Increment | Trigger Event |
|---|---|---|
| Main / Master | Major or Minor | Merge of a feature or release branch |
| Pull Request | Patch | PR creation or update |
| Feature Branch | Alpha/Beta pre-release | Commits during active development |
For feature branches, use a naming pattern such as $(major).$(minor).$(patch)-$(BranchName).$(BuildID) to clearly identify pre-release builds. Additionally, when automation tools commit version updates (like changes to package.json), include [skip ci] in the commit message to avoid triggering the Azure DevOps pipeline unnecessarily [2][3].
Selecting Tools and Automation Methods
Once you’ve defined your artifacts and branching flow, choose tools that integrate well with your Azure DevOps setup. The right tool will depend on your commit style and branching complexity.
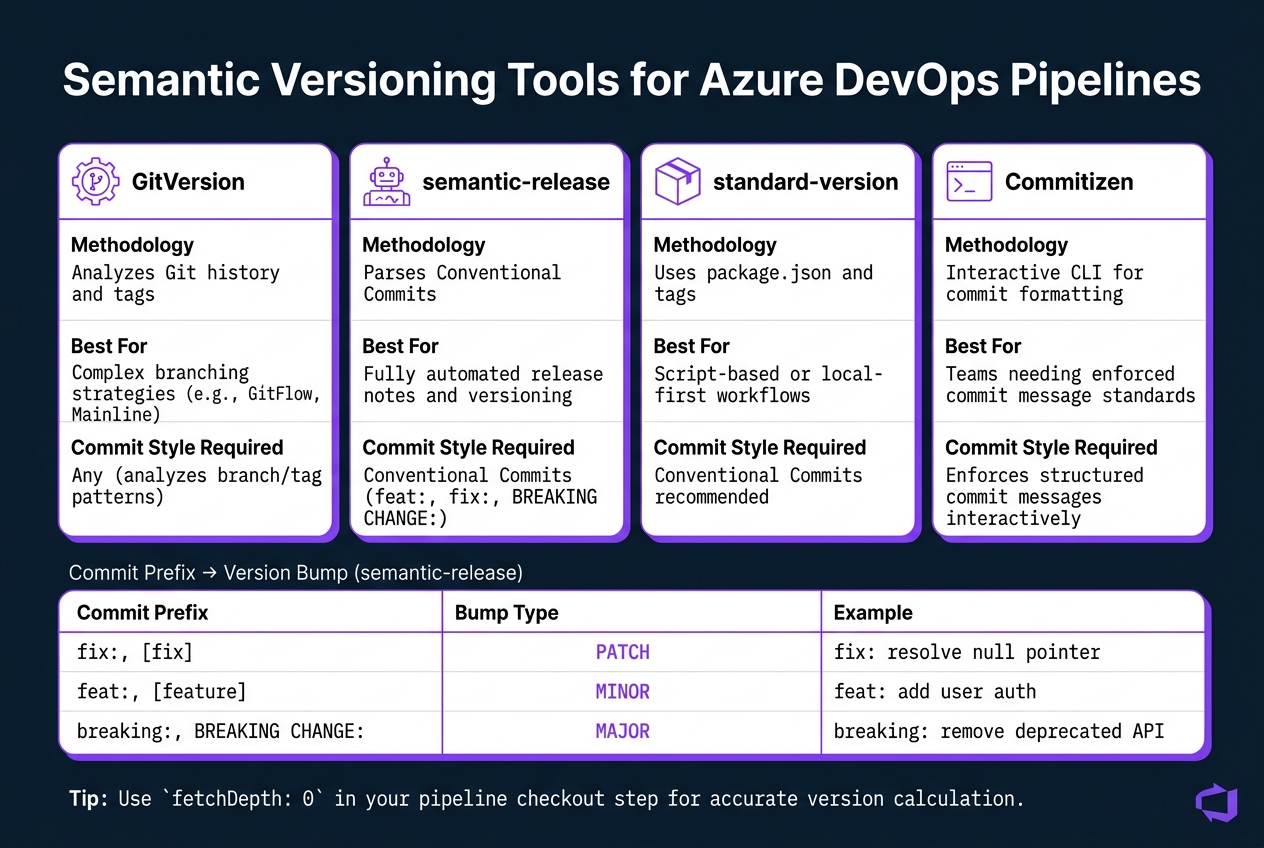
| Tool | Methodology | Best For |
|---|---|---|
| GitVersion | Analyzes Git history and tags | Complex branching strategies (e.g., GitFlow, Mainline) |
| semantic-release | Parses Conventional Commits | Fully automated release notes and versioning |
| standard-version | Uses package.json and tags |
Script-based or local-first workflows |
| Commitizen | Interactive CLI for commit formatting | Teams needing enforced commit message standards |
For teams using Conventional Commits (e.g., fix:, feat:, BREAKING CHANGE:), tools like semantic-release or Commitizen can streamline automated versioning. If your team uses a more intricate branching model, GitVersion might be a better fit. Just ensure that your Azure DevOps pipeline checkout step includes fetchDepth: 0 so GitVersion has access to the full Git history for accurate calculations.
Regardless of the tool you choose, store your versioning rules in a configuration file like GitVersion.yml or pyproject.toml. This keeps your versioning logic consistent and version-controlled alongside your codebase.
Setting Up Semantic Versioning in Azure DevOps
Configuring the Repository
Before you can start running pipelines, you need to prepare your repository. Begin by creating an initial tag, such as v0.1.0, or include a package.json file with "version": "0.0.0" to give automation tools a starting point. Without this setup, these tools will fail during their first execution.
Another critical step is ensuring the right repository permissions are in place. The [Project Name] Build Service account must have three specific permissions: Contribute, Create Tag, and - if your main branch has policies enabled - Bypass policies when pushing. As Andrew Wilson, a Microsoft Azure MVP, explains:
"The Azure DevOps [Project] Build Service must have the following Repository Permissions: Contribute: Permission to push changes to the repository [and] Create Tag: Permission to create and update tags in the repository." [1]
These permissions are essential because they allow the pipeline agent to automatically push version tags back to the repository, completing the automation process for versioning.
Adding Configuration Files
Once your repository is set up, the next step is adding the configuration files needed for versioning tools. These files should be placed at the root of your repository to ensure the pipeline can locate them without needing additional path configurations.
| Tool | Configuration File | Key Setting |
|---|---|---|
| GitVersion | GitVersion.yml |
mode: Mainline for continuous delivery workflows [1][6] |
| standard-version | package.json |
"version": "0.0.0" as the starting point [3] |
| semantic-release | release.config.cjs |
Plugin list including @semantic-release/commit-analyzer [4] |
For GitVersion, using Mainline mode is a solid choice for most continuous delivery workflows. This mode treats every merge into main as a version increment, making it a practical option for teams aiming for streamlined delivery. Storing these configuration files alongside your code ensures that your versioning rules evolve in sync with your project.
Pipeline Configuration
With your repository and configuration files ready, the final step is setting up your pipeline. To ensure everything runs smoothly, you need to enable two critical Git settings: fetchDepth: 0 and persistCredentials: true.
fetchDepth: 0: Ensures the pipeline fetches the full Git history, which is essential for tools like GitVersion to function properly.persistCredentials: true: Allows the build agent to push tags back to the repository securely.
Here's an example of how to configure these settings in your pipeline:
steps:
  - checkout: self
    fetchDepth: 0
    fetchTags: true
    persistCredentials: true
For pull request pipelines, avoid tagging the temporary merge branch Azure DevOps creates automatically. Instead, use a dynamic variable like Source_Branch_Ref to target the actual source branch [1]. Once GitVersion runs, it will populate variables such as $(GitVersion.FullSemVer) and $(GitVersion.MajorMinorPatch), which can be used in downstream tasks.
To make your pipeline runs more transparent, you can update the build display name to reflect the calculated version. Add this command to your pipeline:
echo "##vso[build.updatebuildnumber]$(GitVersion.FullSemVer)"
This simple addition makes it easy to see which version was produced by each pipeline run, without needing to dig through logs for details.
Automating Semantic Version Calculation
Using Git Tags and Scripting
One straightforward way to automate versioning is by directly querying your Git history. A simple command can fetch the latest version tag:
git describe --tags --abbrev=0
You can then use a Bash or PowerShell script to break down the output into its MAJOR, MINOR, and PATCH components and update the relevant part as needed. This method gives you full control over how versions are parsed and handles edge cases effectively. When pushing a new tag back to the repository, remember to include [skip ci] in the commit message. This prevents the pipeline from entering an infinite loop by triggering itself.
For projects with more intricate branching strategies or automation needs, specialized tools can provide additional flexibility.
Using GitVersion
If your team deals with complex branching, GitVersion is a solid option. Andrew Wilson, Chief Consulting Officer at Black Marble, highlights its benefits:
"Automating semantic versioning in Azure DevOps CI/CD pipelines with GitVersion is a game-changer for maintaining consistency, traceability, and efficiency in your development workflow." [1]
To get started, install the GitTools extension and add the gitversion/setup@3 and gitversion/execute@3 tasks to your pipeline. Once executed, GitVersion generates a set of variables you can use immediately:
| Variable | Description | Example |
|---|---|---|
$(GitVersion.SemVer) |
Standard semantic version | 1.2.3 |
$(GitVersion.FullSemVer) |
Full version with build metadata | 1.2.3+5 |
$(GitVersion.MajorMinorPatch) |
Core three-part version number | 1.2.3 |
$(GitVersion.NuGetVersion) |
NuGet-compatible version format | 1.2.3-alpha.1 |
$(GitVersion.AssemblySemVer) |
Version for .NET assembly metadata | 1.2.3.0 |
These variables are accessible to all subsequent tasks in the pipeline. To further customize behavior, you can define branch-specific rules in a GitVersion.yml file. For example, you might append alpha for development branches or rc for release branches [7].
Using semantic-release
Another option is semantic-release, which takes a different approach by analyzing commit messages instead of branch names or merge patterns. Each commit prefix corresponds to a specific version bump:
| Bump Type | Commit Prefix | Example Message |
|---|---|---|
| Major | breaking:, [breaking] |
breaking: remove deprecated API |
| Minor | feat:, [feature] |
feat: add user authentication |
| Patch | fix:, [fix] |
fix: resolve null pointer exception |
| Skip | [skip], skip-ci |
[skip] update documentation |
This makes semantic-release an excellent fit for teams that already use Conventional Commits. To implement it in an Azure DevOps YAML pipeline, place a release.config.cjs file at the root of your repository. This file should list plugins like @semantic-release/commit-analyzer. You'll also need to set up a GH_TOKEN or AZURE_TOKEN environment variable, enabling the tool to push tags and publish release notes. In one seamless process, semantic-release tags the repository and generates a changelog, making it a great choice for teams that value automated changelog creation.
Pick the method that best aligns with your team's workflow and project requirements.
Applying Semantic Versions to Artifacts and Deployments
Versioning Build Artifacts
Once a version is determined using tools like GitVersion or semantic-release, the next step is applying it consistently to every artifact your pipeline generates. To update the pipeline's build number, use the following command:
echo "##vso[build.updatebuildnumber]$(Version)"
This ensures every artifact is tied to a unified identifier through $(Build.BuildNumber). Here's how to implement it for various artifact types:
- NuGet: Use the
DotNetCoreCLI@2task withversioningScheme: byEnvVar, referencingGitVersion.NuGetVersion. - npm: Run
npm version <version> --no-git-tag-versionbefore publishing. - Docker: Pass the version to the
Docker@2task usingtags: $(Build.BuildNumber). - Maven: Use the
versions-maven-pluginwith-DnewVersion=$(Version). - ARM Templates: Inject the version into the
contentVersionfield using theVersionJSONFile@3task.
| Artifact Type | Implementation Method | Key Variable/Property |
|---|---|---|
| NuGet | DotNetCoreCLI@2 task |
versioningScheme: byEnvVar |
| npm | npm version command |
--no-git-tag-version |
| Maven | versions-maven-plugin |
-DnewVersion=$(Version) |
| ARM Templates | VersionJSONFile@3 task |
contentVersion field |
| Docker | Docker@2 task |
tags: $(Build.BuildNumber) |
For infrastructure deployments, Andrew Wilson, Chief Consulting Officer at Black Marble, outlined a method where the VersionJSONFile@3 task injects a GitVersion-calculated version into the contentVersion field of azuredeploy.json. This file is then published as a pipeline artifact named ARM-Templates, making it accessible in downstream stages [1].
Persisting Versions Across Stages
Once artifacts are versioned, the semantic version needs to flow seamlessly between pipeline stages. This can be achieved by setting an output variable:
echo "##vso[task.setvariable variable=Version;isOutput=true]$(GitVersion.SemVer)"
Downstream jobs must explicitly map this variable to access it. Additionally, ensure your checkout step includes both fetchDepth: 0 and persistCredentials: true. This allows GitVersion to access the full Git history for accurate version calculation and enables scripts to push tags or commits back to the repository [1].
Tagging and Publishing Strategies
After versioning artifacts and linking stages, the final step is tagging the commit and managing package publications. Use an annotated Git tag to permanently associate the artifact with its commit:
git tag -a "v$(Version)"
git push --follow-tags
Before pushing tags, ensure the Build Service has the necessary Contribute and Create Tag permissions.
For publishing in Azure Artifacts, leverage feed views like @Local, @Prerelease, and @Release as quality gates. Packages move through these views based on their testing and approval status:
- Start in
@Localafter initial creation. - Move to
@Prereleaseafter passing automated tests. - Promote to
@Releaseafter manual approval tied to an Azure DevOps Environment.
If a version needs to be withdrawn, use the REST API to delist it instead of deleting it. This prevents new consumers from adopting the version while maintaining reproducibility for existing builds.
Governance and Best Practices
To round out your semantic versioning strategy, strong governance and validation practices are key to maintaining consistency and traceability across releases.
Enforcing Versioning Rules
Consistency in versioning starts with well-structured commit messages. Adopting Conventional Commits (e.g., fix:, feat:, BREAKING CHANGE:) allows tools like GitVersion and semantic-release to accurately calculate version increments. Without this structure, automated versioning becomes unreliable. The best way to enforce such rules? Catch issues early with pre-commit hooks. Tools like Commitizen can ensure that non-conforming messages never make it to the remote repository. This simple yet crucial step underpins the entire automated versioning process.
"Versioning is the unsung hero of software development - often overlooked but absolutely essential. Imagine trying to manage a project without a clear way to track changes, communicate updates, or ensure compatibility. Chaos, right?" - Andrew Wilson, Chief Consulting Officer, Black Marble [1]
Approval and Validation Workflows
Not all version bumps are created equal. A PATCH update carries far less risk than a MAJOR change. For high-impact increments, you can use the ManualValidation@1 task to pause the pipeline until an authorized reviewer approves the change. Additionally, implementing a custom verification script (e.g., verify-release.js) can ensure the calculated version aligns with the intended changes before publishing any artifacts. This step is particularly important in regulated environments, where an unexpected MAJOR bump could lead to compliance issues or signal breaking changes for downstream users.
Once approvals are in place, maintaining traceability ensures that every versioned artifact is linked back to its source.
Ensuring Traceability and Compliance
As mentioned earlier, using the full Git history and annotated tags is critical for creating an unbroken audit trail. By setting fetchDepth: 0 in your checkout task, you ensure the full Git history is available - enabling tools like GitVersion to calculate versions based on the complete development timeline. Annotated Git tags further associate each version with its corresponding commit.
To go a step further, embed version information directly into artifact metadata. For example, include version details in NuGet packages, Docker images, or ARM templates. This ensures that even if your build system changes, the artifact retains its identity. Additionally, leveraging Azure DevOps's work item linking on pull requests provides a complete chain of traceability: work item → PR → commit → build → versioned artifact → deployment.
Governance Summary Table
| Governance Area | Recommended Control | Tooling |
|---|---|---|
| Rule Enforcement | Conventional Commits with pre-commit hooks | Commitizen, GitVersion |
| Validation | Manual approval gate for major/minor bumps | ManualValidation@1 task |
| Traceability | Annotated Git tags and artifact metadata stamping | git tag, VersionJSONFile@3 |
| Security | Restrict "Contribute" and "Create Tag" permissions | Azure Repos Permissions |
| CI Loop Prevention | Include "[skip ci]" in automated version commits | Git commit conventions |
Conclusion
Semantic versioning takes the guesswork out of version management, turning what used to be a tedious, error-prone task into a streamlined, automated process. Using the MAJOR.MINOR.PATCH format alongside tools like GitVersion or semantic-release, your Azure DevOps pipelines can automatically calculate, assign, and publish version numbers - no debates, no manual input, just consistency.
"Whether you're managing simple projects or complex, feature-rich solutions, adopting semantic versioning practices ensures that your team and stakeholders have a clear understanding of changes, compatibility, and release impact." - Andrew Wilson, Chief Consulting Officer, Black Marble [1]
One of the biggest advantages lies in traceability. Every artifact - whether it's a NuGet package, Docker image, or ARM template - can carry a semantic version tied directly to a Git tag and commit. This creates a clear, traceable path from a work item to its deployment in production. For industries with strict regulatory requirements, this level of auditability is essential. For everyone else, it simplifies troubleshooting and boosts efficiency.
The key to making this work is Conventional Commits. Without a structured approach to commit messages, automation tools can't reliably decide whether to update a MAJOR, MINOR, or PATCH version. By implementing this discipline early - using pre-commit hooks or tools like Commitizen - you set the stage for a seamless pipeline where everything just works.
While semantic versioning might not be the flashiest part of development, it's an investment that pays off every single time you release. Start with small steps, automate where you can, and build a system where versioning becomes effortless and unquestionable.
FAQs
How do I choose between GitVersion and semantic-release?
Choose GitVersion if you're looking for precise control over versioning tied to your Git history and branch strategies. It automates semantic versioning, but you'll need to configure it properly to fit your workflow.
On the other hand, semantic-release is ideal for fully automating versioning and generating changelogs based on commit message conventions. While it makes the release process easier, it relies heavily on consistent commit practices and might require extra setup when integrating with Azure DevOps pipelines.
Both tools are reliable options for implementing semantic versioning - it just depends on your specific needs and setup preferences.
Why does my pipeline need fetchDepth: 0?
Setting fetchDepth: 0 guarantees a full repository clone, which is essential for tools like GitVersion to calculate version details correctly. By default, a shallow clone (with a depth of 1) can disrupt versioning tools, leading to inaccurate results. It's also important to clean the workspace beforehand to prevent leftover shallow repositories from affecting the version calculations. This approach helps maintain dependable semantic versioning within your Azure DevOps pipeline.
How do I version IaC like ARM, Bicep, or Terraform?
Versioning Infrastructure as Code (IaC) tools in Azure DevOps pipelines becomes much simpler with automation that follows semantic versioning principles. Tools like GitVersion or semantic-release can automatically update versions in the format MAJOR.MINOR.PATCH, depending on the type of changes made.
To implement this, configure your pipelines to embed these versions directly into your IaC templates, either as metadata or variables. This ensures that each version is traceable and meaningful. For example, whether you're working with ARM, Bicep, or Terraform files, having consistent and clear versioning policies is essential for maintaining structure and clarity in your deployments.