Private Endpoints for Azure Service Bus: Setup Guide
Azure Service Bus typically relies on public internet access, but private endpoints provide a secure way to connect through your Azure Virtual Network using private IP addresses. Here's how they work and why you might need them:
- What They Are: Private endpoints assign a private IP from your VNet to your Service Bus, ensuring access is limited to your internal network.
- Why Use Them: They eliminate public internet exposure, improving security and compliance with standards like HIPAA and PCI DSS. They also enhance network control and performance by keeping traffic within Azure's private backbone.
- Requirements: You'll need a Premium Service Bus namespace, a VNet with a configured subnet, and proper permissions. The private endpoint and VNet must share the same Azure region.
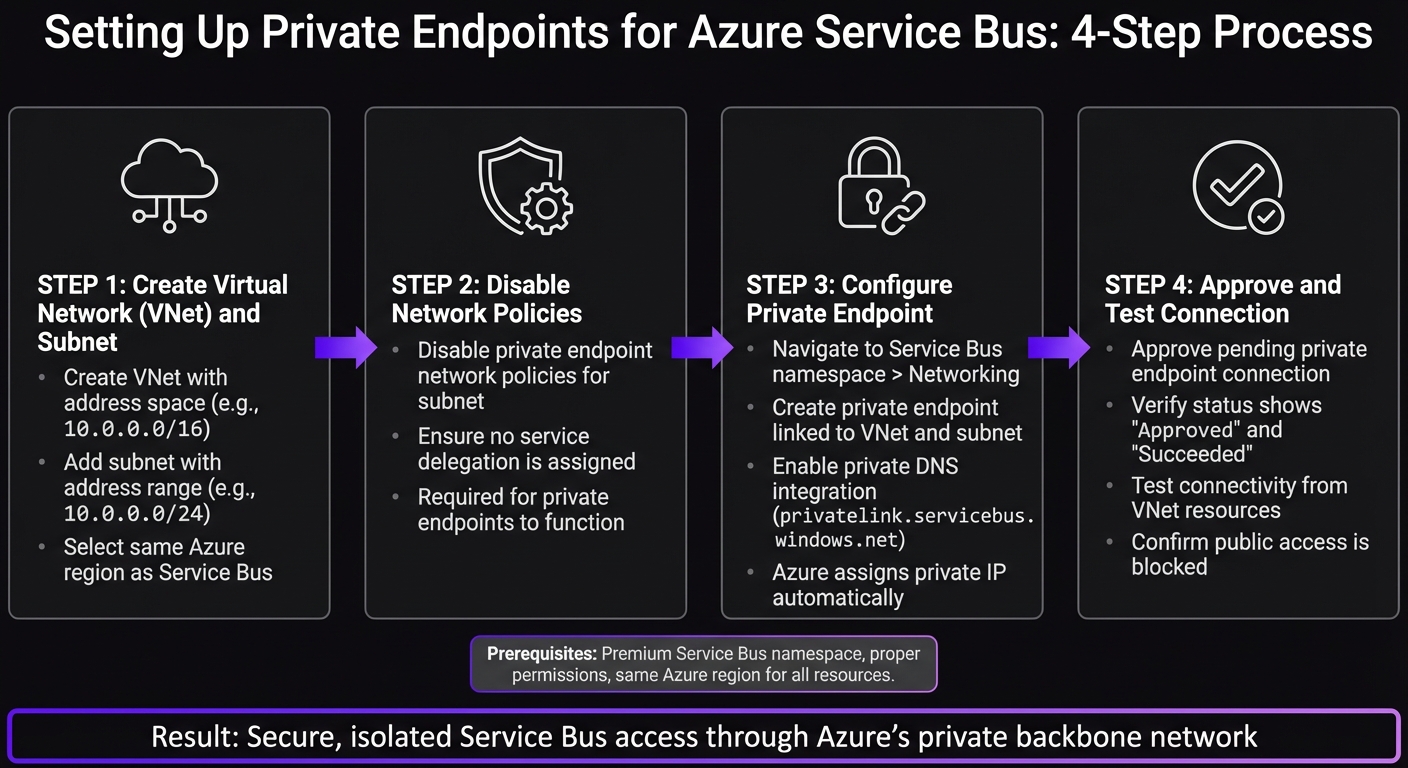
To set up:
- Create a Virtual Network (VNet) and subnet in the Azure Portal or CLI.
- Disable network policies for the subnet to allow private endpoints.
- Configure a private endpoint for your Service Bus namespace, enabling private DNS integration.
- Approve the private endpoint connection in the Azure Portal.
Finally, test connectivity to ensure only VNet resources can access the Service Bus. This setup boosts security and restricts access to your internal network.
Azure Service Bus Private Endpoint Setup: 4-Step Configuration Process
Understanding Private Endpoints in Azure | VM, VNet, Service Endpoint, and Storage Account Demo
sbb-itb-79ce429
Setting Up Virtual Network and Subnet
To create a private endpoint for your Service Bus namespace, you first need a Virtual Network (VNet) and a properly configured subnet. These will serve as the foundation for your private endpoint, so it's important to set them up correctly.
Creating a Virtual Network
Start by navigating to the Azure Portal and searching for "Virtual Networks." Click Create, then fill out the required details:
- Subscription: Select your subscription.
- Resource Group: Choose or create a group, like
test-rg. - VNet Name: Assign a name, such as
vnet-1. - Region: Pick the same location where your private endpoint will reside.
Next, move to the IP Addresses tab and define your address space. A commonly used range is 10.0.0.0/16. If you prefer automation, you can use the Azure CLI with this command:
az network vnet create --resource-group test-rg --name vnet-1 --address-prefixes 10.0.0.0/16
This method is especially useful for streamlining deployments in DevOps pipelines.
Configuring a Subnet for Private Endpoints
After creating the VNet, you'll need to set up a subnet specifically for private endpoints. Go to the Subnets section of your VNet in the portal and click Add. Follow these steps:
- Name: Use a descriptive name like
subnet-1. - Address Range: Assign a range, such as
10.0.0.0/24, which provides 256 IP addresses.
One important step: disable network policies for the subnet. This is required for private endpoints to function properly. Ensure the subnet is not assigned any service delegation [1].
To configure this via the Azure CLI, run the following command:
az network vnet subnet create --resource-group test-rg --vnet-name vnet-1 --name subnet-1 --address-prefixes 10.0.0.0/24 --disable-private-endpoint-network-policies true
Now that your VNet and subnet are ready, you can proceed to create the private endpoint in the next step.
Configuring Private Endpoints for Azure Service Bus
Now that your VNet and subnet are set up, it’s time to create the private endpoint for your Service Bus namespace. This step ensures your messaging infrastructure is only accessible from within your VNet. Follow these steps in the Azure Portal to create and approve the private endpoint.
Creating a Private Endpoint via Azure Portal
Head over to your Service Bus namespace in the Azure Portal. Under the Networking section in the left-hand menu, click on Private endpoint connections. Then, click the Private endpoint button at the top to start the creation wizard.
Here’s how to proceed using the VNet and subnet (vnet-1 and subnet-1) you set up earlier:
- Basics: Choose your subscription and resource group. Give the endpoint a name (e.g.,
pe-servicebus-1). The Network Interface Name will default to the endpoint name with-nicappended, but you can customize it. Select the region where your Service Bus resides. - Resource: The wizard should automatically detect your Service Bus namespace. Make sure the Target sub-resource is set to
namespace. - Virtual Network: Select
vnet-1andsubnet-1. Azure will assign a private IP automatically through Private DNS integration. - DNS: Enable private DNS integration. Azure will use or create a
privatelink.servicebus.windows.netzone and add the necessary A record. This allows resources in your VNet to resolve the Service Bus namespace’s hostname to its private IP instead of the public one.
Once everything is set, click Review + create and then Create. The deployment typically finishes in 2-3 minutes. When it’s done, your private endpoint will appear in the list with a provisioning state of Succeeded.
Approving the Private Endpoint Connection
After creating the private endpoint, you’ll need to approve the connection to make it active. Go back to the Networking section of your Service Bus namespace and click on Private endpoint connections. You’ll see your newly created endpoint with a connection state of Pending.
Click on the endpoint, then select Approve at the top. Add a brief description for reference (e.g., "Approved for production VNet access") and confirm by hitting Yes.
Within seconds, the connection state will update to Approved, and the provisioning state will show Succeeded. At this stage, your Service Bus namespace is now securely accessible via the private endpoint from any resource within your VNet.
Validating and Testing Private Endpoint Connectivity
Once your private endpoint is approved, it’s time to confirm that everything is set up correctly. The goal here is to ensure that connectivity is restricted to your VNet and functions as expected.
Verifying Endpoint Status
Start by heading to the Azure Portal. Navigate to Networking > Private endpoint connections within your Service Bus namespace. Check that the connection status reads "Approved" and the provisioning state says "Succeeded." If it doesn’t, wait a few minutes and refresh the page to see if the status updates.
Testing Connectivity from VNet Resources
To test, deploy a VM inside your VNet (for example, in subnet-1). Use tools like the Azure SDK or Service Bus Explorer to send a test message via the standard hostname. This hostname should resolve to the private IP, confirming private connectivity. Next, try accessing the Service Bus from an external resource. You should encounter a 401 Unauthorized error, which indicates that public access is effectively blocked.
Public vs. Private Endpoint Access Comparison
Here’s a quick comparison of how public and private endpoints differ:
| Feature | Public Endpoint | Private Endpoint |
|---|---|---|
| Path | Public Internet | Microsoft Backbone Network |
| IP Address | Public IP | Private IP (within your VNet) |
| Access Control | IP Firewall & VNet Rules | NSGs & Private Link |
| Security | Exposed to public internet | Isolated from public internet |
| Connectivity | Any network with internet | VNet, Peered VNets, VPN, or ExpressRoute |
| Latency | Variable (internet-dependent) | Lower and consistent (internal) |
Conclusion and Key Takeaways
To configure private endpoints for Azure Service Bus, you'll need to set up a VNet, subnet, and private endpoint, followed by verifying the connection. Though the process is straightforward, the improvements in security and performance are immense. By following this guide, you not only simplify network management but also enhance your overall security framework. These secure connections provide both peace of mind and operational reliability.
Key Benefits of Private Endpoints
Private endpoints remove the need for public internet exposure altogether. Traffic is routed through the Microsoft backbone network, bypassing public IP addresses entirely. This significantly reduces the attack surface - there's no public endpoint for malicious actors to exploit.
Another major advantage is the precise access control they offer. Unlike service endpoints, which operate at the subnet level, private endpoints connect to specific resource instances. This means you can tightly control which applications can access particular Service Bus namespaces. Additionally, tools like Network Security Groups and Azure Firewall integrate smoothly, allowing for detailed traffic filtering.
Keeping traffic on Azure's private backbone also ensures consistent performance, with predictable latency and throughput.
Next Steps and Further Resources
After completing the setup, the next focus should be on monitoring and scaling your deployment. Enable diagnostic settings to send logs and metrics to a Log Analytics workspace. This will help you track connectivity patterns and analyze usage trends. If you're managing multiple VNets, consider using VNet peering to route traffic to a single private endpoint or deploying dedicated endpoints in each VNet based on your isolation needs.
For organizations that require secure, production-ready AI infrastructure on Azure, AppStream Studio offers end-to-end solutions. They specialize in the Microsoft AI stack (.NET, C#, Azure, Semantic Kernel, Azure AI Services) and cater to industries such as healthcare, financial services, and enterprises with compliance needs like HIPAA, SOC 2, and ISO 27001. Their services include identifying where AI agents fit, designing and building them, implementing RAG and semantic search for accuracy, and deploying them securely on Azure.
Keep exploring Azure's security features and monitoring tools to ensure your private endpoint deployment remains secure and optimized over time.
FAQs
Can I use private endpoints with a non-Premium Service Bus namespace?
Yes, you can use both public network access and private endpoints with Azure Service Bus. But keep in mind that if public network access is turned off, only private endpoints will work. In this case, the Service Bus needs to be on the Premium tier.
How do I make Service Bus work from on-prem via VPN or ExpressRoute?
To connect to Azure Service Bus from an on-premises environment using VPN or ExpressRoute, private endpoints are the way to go. These endpoints assign a private IP address from your virtual network (VNet) directly to the Service Bus, ensuring all traffic is routed securely through the Azure backbone network.
Make sure your VPN or ExpressRoute is linked to the VNet that hosts the private endpoint. Additionally, update your network security rules to permit traffic from your on-premises network to the Service Bus's private IP address. This setup ensures a secure and reliable connection.
What are the most common DNS issues with Service Bus private endpoints?
When working with Service Bus private endpoints, DNS problems can often crop up. A frequent issue is DNS resolution failures, which typically happen because of misconfigured or unlinked private DNS zones. Overlapping DNS zones or conflicting settings can also disrupt proper name resolution.
Another potential roadblock comes from NSG (Network Security Group) rules. These rules might block DNS traffic or prevent connections to the private endpoint's IP addresses, leading to connectivity troubles.
To avoid these headaches, double-check that your private DNS zones are properly linked and configured. Also, ensure your NSG rules permit the necessary traffic to maintain smooth operation.