Azure SQL Advanced Threat Protection: Setup Guide
Azure SQL Advanced Threat Protection (ATP) is designed to safeguard your cloud databases by monitoring activity for unusual behavior and potential threats like SQL injection and unauthorized logins. Here's what you need to know to get started:
- What it does: Monitors database activity, detects anomalies using machine learning, and provides weekly vulnerability assessments.
- Supported platforms: Azure SQL Database, Azure SQL Managed Instance, Azure Synapse Analytics, SQL Server on Azure VMs, and SQL Server enabled by Azure Arc.
- Cost: $15 per server/month, plus $0.02 per GB for log analytics storage.
- How to enable: Activate ATP via the Azure Portal or PowerShell, configure alert notifications, and optionally enable database auditing for detailed logs.
- Key benefits: Detects threats in real-time, helps meet compliance standards (e.g., PCI DSS, HIPAA, GDPR), and provides actionable alerts for quick responses.
To set up ATP, ensure you have the required permissions (e.g., SQL Security Manager role) and consider enabling it at the subscription level for broader coverage. Once active, configure custom alerts and integrate audit logs with Azure Storage or Log Analytics for long-term retention and detailed investigations.
Pro Tip: Run ATP in monitoring mode for 2–4 weeks to establish baseline behaviors and reduce false positives. Regularly review and adjust alert settings for optimal accuracy.
The Benefits of Advanced Threat Protection in Azure SQL Database | Data Exposed: MVP Edition
sbb-itb-79ce429
Preparing Your Environment for Setup
Before activating ATP, it's crucial to ensure you have the right permissions and access to Azure management tools. ATP supports Azure SQL Database, Azure SQL Managed Instance, Azure Synapse Analytics, SQL Server on Azure VMs, and SQL Server enabled by Azure Arc. To configure security settings, your account must hold one of these roles: SQL Security Manager, Server Admin, or Database Admin. Without these roles, you'll encounter authorization errors. Meeting these prerequisites ensures ATP's threat detection features work smoothly across all your cloud databases.
System Requirements and Permissions
ATP is included in the Microsoft Defender for SQL plan within Microsoft Defender for Cloud. You can enable it either across an entire subscription or on individual servers. Subscription-wide activation is recommended because it protects both existing and future databases. When you enable Defender for SQL, a storage account is automatically created in the same resource group and region to store vulnerability assessment scan results.
Although database auditing isn't mandatory to enable ATP, turning it on enhances your ability to investigate threats. With auditing enabled, you gain access to detailed query logs, which are essential for understanding security incidents. Without it, you'll still receive alerts but lack the context needed for a thorough analysis.
Once you've verified permissions and system requirements, you can proceed to configure ATP via the Azure Portal or PowerShell.
Accessing the Azure Portal or PowerShell
After assigning the necessary roles, you can set up ATP using your preferred management tool. In the Azure Portal, log in and navigate to your logical server or managed instance. From there, go to the Microsoft Defender for Cloud option under the Security section. Alternatively, you can use PowerShell with the Set-AzSecurityPricing cmdlet to enable protection at the subscription level.
For production environments, consider using Terraform (via azurerm_mssql_server_security_alert_policy) or ARM templates to manage security policies. These tools help maintain consistent and compliant configurations. Keep in mind that ATP at the server level is required, as database-level configuration is no longer supported and increases management complexity.
Step-by-Step Setup Guide
Azure SQL Advanced Threat Protection Setup Process and Configuration Steps
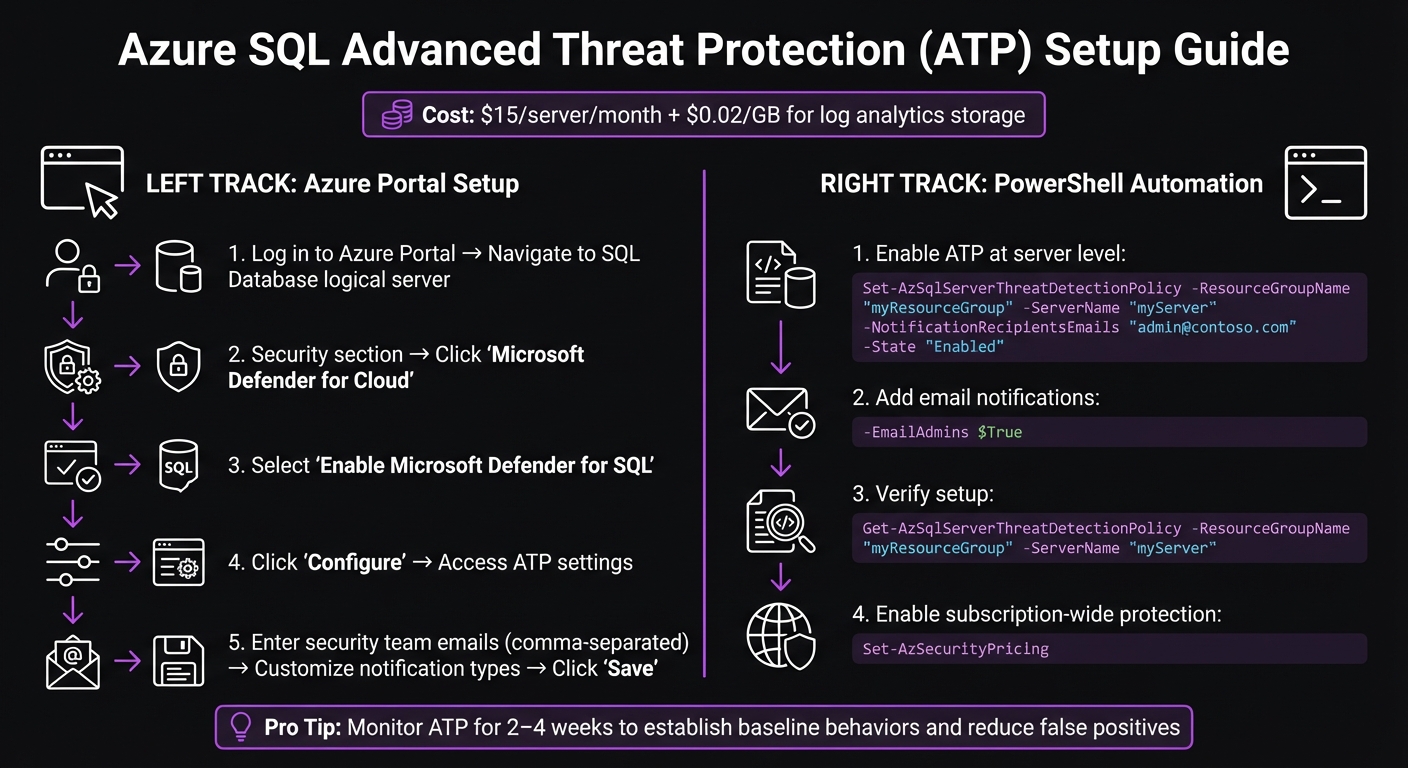
To get started with Advanced Threat Protection (ATP), you can activate it via the Azure Portal or PowerShell after confirming permissions. The service costs approximately $15 per server per month and $0.02 per GB for log analytics storage [1]. It provides consistent protection at a reasonable price.
Enabling Advanced Threat Protection in the Azure Portal
Here’s how to set it up through the Azure Portal:
- Log in to the Azure Portal and navigate to your SQL Database logical server configuration.
- Under the Security section, click on Microsoft Defender for Cloud.
- If the service isn’t already active, select Enable Microsoft Defender for SQL.
- Click on Configure to access Advanced Threat Protection settings.
- Enter the email addresses of your security team (comma-separated) under the notification settings.
- Customize the Notification types to match alert severity levels.
- Finally, hit Save to apply your changes.
This method works well for smaller setups or one-time configurations. If you’re managing a larger environment or need automation, PowerShell is the way to go.
Automating Setup with PowerShell
For centralized and repeatable deployments, PowerShell is a better choice. To enable ATP at the server level, use the following command:
Set-AzSqlServerThreatDetectionPolicy -ResourceGroupName "myResourceGroup" -ServerName "myServer" -NotificationRecipientsEmails "admin@contoso.com" -State "Enabled"
To ensure database administrators are notified of unusual activity, add the parameter:
-EmailAdmins $True
After enabling ATP, confirm the setup by running:
Get-AzSqlServerThreatDetectionPolicy -ResourceGroupName "myResourceGroup" -ServerName "myServer"
This command will verify that the ThreatDetectionState is set to Enabled.
For broader protection across all current and future databases in your subscription, use this command:
Set-AzSecurityPricing
This ensures that Microsoft Defender for SQL is applied subscription-wide, saving you from configuring each server individually. Before enforcing strict security measures in a production environment, monitor ATP for 2–4 weeks. This helps you understand normal administrative behavior and reduce false positives.
Configuring Alerts and Notifications
Once Advanced Threat Protection is enabled, the next step is to set up custom notifications and manage audit log retention. While the default settings notify subscription administrators, tailoring these alerts ensures they align with your security team's specific needs.
Customizing Threat Alerts
To customize alerts, head to the Microsoft Defender for Cloud settings under the Security section of your SQL Database logical server. You can add specific email addresses (comma-separated) to ensure your security operations team receives critical notifications. If you want subscription administrators to automatically get alerts, set the Email account admins option to true.
For environments with high activity, prioritize notifications based on severity. High-priority events like SQL injection or brute force attacks demand immediate attention, while lower-priority issues, such as logins from unusual Azure data centers, might only need periodic review. If certain alerts are unnecessary due to expected behavior, you can disable them using PowerShell.
Email isn’t your only option for receiving alerts. By creating Action Groups in the Azure Monitor Alerts menu, you can route notifications to SMS, webhooks, or Azure Functions. This flexibility allows seamless integration with incident management tools or automated response systems. These tailored alerts, combined with proper audit log storage, also help meet compliance requirements.
Integrating with Azure Storage for Audit Logs
Beyond alerts, securely storing audit logs is essential for thorough threat investigations. Pairing threat detection with Azure SQL Auditing ensures detailed event data is captured for analysis.
To set this up, configure the storageEndpoint parameter to connect to an Azure Blob Storage account. For best performance, deploy the storage account in the same region as your SQL server. Use Managed Identity for authentication - this minimizes credential risks and simplifies key rotation. Set the retentionDays parameter according to your compliance needs. For example, 90 days is typical for general monitoring, but industries like financial services often require 7 years of retention. If unlimited retention is needed, set the value to 0, with storage costs averaging $0.02 per GB for log analytics [1].
Ensure the SQLSecurityAuditEvents diagnostic setting stays active. If this setting is accidentally removed, auditing will stop without any error notifications. Threat notification emails include direct links to the Azure portal, where you can review the vulnerable SQL statement (in cases like injection alerts) and follow suggested mitigation steps, streamlining your response process.
With these configurations in place, you'll be well-prepared to monitor threats effectively and establish robust response protocols.
Monitoring and Managing Threats
This section focuses on how to keep an eye on potential threats and take action effectively, building on the foundation of alert configurations.
Using the Azure Portal for Threat Monitoring
Once your alerts are set up, you can track detected threats via the Microsoft Defender for Cloud dashboard. Head over to the Security section of your SQL server to see a list of active alerts. Each alert includes key details like the type of threat, its severity, and the timestamp, making it easier to prioritize your response.
Clicking on an alert reveals more specifics. For example, in the case of SQL injection attempts, you'll find information such as the vulnerable SQL statement, the source IP, the username involved, and the affected database. These details are critical for quickly determining if an alert signals a real threat or just a false positive. To dig deeper into incidents, make sure SQL auditing is enabled. This level of detail is crucial for setting up an effective response strategy.
Establishing Response Procedures
The insights from the threat monitoring dashboard are essential for crafting your response procedures. Start by defining operational baselines - these help you understand normal access patterns and reduce the chances of being overwhelmed by false positives.
With a baseline in place, you can create a decision tree for handling alerts. Begin by checking if an alert matches any known patterns to rule out false positives. If the alert is genuine, assess its severity. For high-priority threats, take immediate action, such as isolating the affected database by switching it to read-only mode. Capture active connections for forensic analysis to understand the scope of the breach. For less critical issues, log them for review during your next security audit.
To streamline responses, use Azure Logic Apps to automate actions when alerts are triggered. For instance, you can automatically send Slack notifications to your security team or create tickets in ServiceNow for high-severity alerts. To avoid alert fatigue, set up suppression rules for recurring false positives, like those caused by nightly ETL processes or scheduled maintenance tasks.
A well-optimized Advanced Threat Protection (ATP) setup should aim for an alert accuracy rate of over 70%, with vulnerabilities addressed within 30 days. Regularly revisit your suppression rules and baseline assumptions - ideally every quarter - since application updates can change what qualifies as normal behavior.
"ATP isn't a 'set and forget' tool - it's most effective when integrated into your security culture." - Arthur C. Codex, AI Author, Reintech [1]
Advanced Use Cases and Best Practices
Once you've set up the basics of Advanced Threat Protection (ATP), there are ways to take it to the next level, especially if you're working in environments with strict compliance needs or high-security demands. These advanced configurations ensure you're not just meeting standards but actively strengthening your defenses.
Combining Threat Detection with Database Auditing
Pairing ATP with database auditing gives you a more complete picture when investigating potential security incidents. To ensure no gaps in coverage, deploy ATP at the server level - this way, any new databases added are automatically protected [1][2].
For storage, consider using Log Analytics for real-time monitoring and running queries with KQL. Meanwhile, send audit logs to Azure Storage for long-term retention. For industries like financial services, which often require audit logs to be kept for at least seven years, Azure Storage offers a cost-efficient option [1]. The good news? Auditing typically adds less than 5% overhead to performance, so it won’t noticeably impact most production workloads [2].
Focus your auditing efforts on critical action groups. For example:
- SUCCESSFUL_DATABASE_AUTHENTICATION_GROUP: Essential for compliance tracking.
- FAILED_DATABASE_AUTHENTICATION_GROUP: Useful for spotting brute-force attacks [2].
By combining ATP's threat alerts with the detailed logs from auditing, you create a solid foundation for meeting regulatory requirements and enhancing your security posture.
Optimizing for Regulated Environments
For industries like healthcare and financial services, it's essential to align ATP features with specific compliance frameworks. Here's a quick look at how ATP and related tools map to key regulations:
| Framework | Regulatory Requirement | Relevant ATP/Security Feature |
|---|---|---|
| HIPAA | §164.312(b) Audit Controls | Vulnerability assessments and database auditing [1] |
| PCI DSS | 10.2 Audit trail for database access | Access anomaly logs and ATP alerts [1] |
| GDPR | Article 32 Security of processing | Data exfiltration monitoring [1] |
| SOC 2 | CC6.1 Logical access controls | Anomaly detection and Entra ID integration [1] |
For HIPAA compliance, implement Transparent Data Encryption (TDE) with Customer-Managed Keys stored in Azure Key Vault. This ensures you maintain full control over your encryption keys. Replace SQL logins with Microsoft Entra ID for authentication to enable Multi-Factor Authentication and streamline Role-Based Access Control. Additionally, use Managed Identities for storage authentication instead of relying on Storage Access Keys, reducing the risk of credential exposure.
Tailor your log retention policies to meet industry-specific requirements. For instance, healthcare organizations often require logs to be retained for 365 days, while financial services may need up to seven years [1]. Enable Vulnerability Assessments to run automated scans weekly, helping you catch misconfigurations or excessive permissions early. Finally, conduct quarterly simulations, such as mock SQL injection attacks, to test response times and ensure alert workflows function as expected - aiming for alert latency under five minutes.
Conclusion and Key Takeaways
Recap of Configuration Steps
Getting started with Azure SQL Advanced Threat Protection (ATP) is a straightforward process. Begin by enabling ATP at the server level instead of configuring it for individual databases. This approach ensures full coverage and helps keep costs predictable - approximately $15 per server per month, plus $0.02 per GB for log analytics[1]. After activation, configure alert notifications and link audit logs to Azure Storage or Log Analytics.
Once ATP is enabled, run it in monitoring-only mode for 2–4 weeks. This period helps establish baseline access patterns and identify legitimate activities. Use this information to set suppression rules for known-good behaviors, like scheduled nightly ETL jobs, to minimize unnecessary alerts. If your accuracy target falls below 50%, revisit and fine-tune your baseline assumptions. These steps lay the groundwork for a well-tuned ATP setup, ensuring effective threat detection and response.
Final Thoughts and Recommendations
Beyond the initial setup, maintaining strong security depends on consistent automation and regular policy reviews. Database security has become a critical priority for businesses. As Arthur C. Codex from Reintech puts it:
"Database security isn't just an IT concern anymore - it's a business imperative"[1].
ATP enhances your security posture by using behavioral analysis and 24/7 monitoring to detect threats that traditional firewalls might miss. It leverages machine learning to identify unusual query patterns and anomalies.
To streamline responses, use Azure Logic Apps to automate workflows. For example, you can route high-severity ATP alerts to platforms like Slack or IT ticketing systems for immediate action[1]. Stay proactive by addressing vulnerabilities swiftly and aligning log retention policies with industry regulations. Financial services often require seven years of log retention, while healthcare mandates a minimum of 365 days[1]. These steps ensure compliance and reinforce your defense strategy.
FAQs
What threats does Azure SQL ATP detect?
Azure SQL Advanced Threat Protection keeps an eye out for activities that could signal potential security risks. These might include SQL injection attempts, logins from unexpected locations or unknown users, the use of potentially risky applications, brute force attacks targeting SQL credentials, and exposure to SQL injection vulnerabilities. By monitoring and flagging these suspicious behaviors, it provides an added layer of security for your database.
Do I need to enable SQL Auditing for ATP to work well?
Enabling SQL Auditing is a smart move when using Azure SQL Advanced Threat Protection. It allows you to monitor and log database activities, which is crucial for identifying unusual behavior or potential threats.
With auditing in place, you get access to detailed activity logs. These logs not only help with effective threat detection but also support quick responses to security issues. Plus, they play a key role in maintaining compliance with industry regulations and standards.
How can I reduce false positives after enabling ATP?
If you're dealing with too many false positives in Azure SQL Advanced Threat Protection (ATP), the key is to fine-tune its detection rules and alerts to fit the specifics of your environment. Start by customizing the rules to exclude activities you know are safe - like actions from internal IP addresses or specific, trusted user behaviors.
Another important step is to regularly review and adjust alert thresholds. By analyzing patterns in your normal, day-to-day activity, you can identify what’s expected and set thresholds accordingly. This not only cuts down on unnecessary alerts but also ensures that genuine threats are easier to spot.