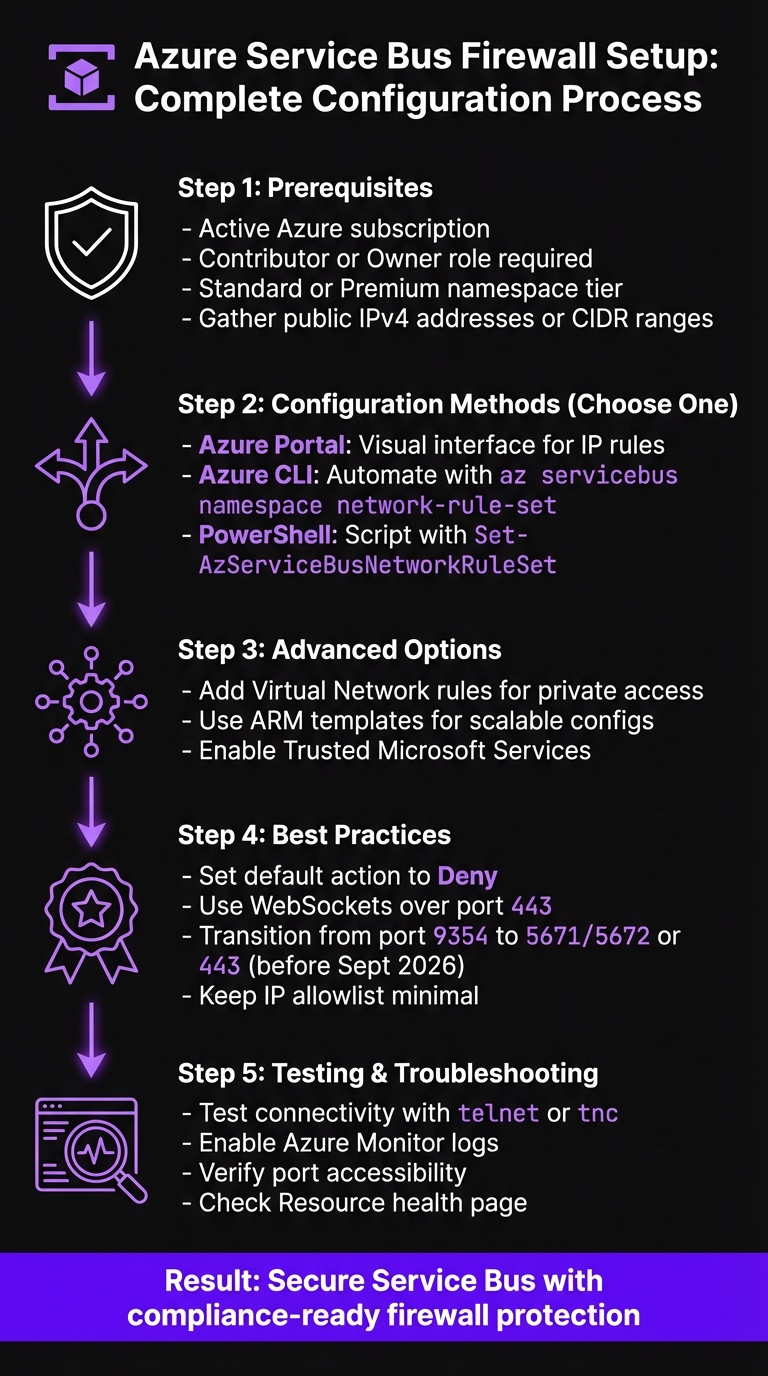
Azure Service Bus Firewall Setup Guide
Want to secure your Azure Service Bus? Start by configuring firewall rules. Here's the quick rundown:
- Why it matters: Azure Service Bus connects apps, devices, and services. Without firewalls, it’s vulnerable to internet threats.
- What it does: Firewalls restrict access to specific IPs, ranges, or Virtual Networks, adding a layer of security.
- Who needs it: Essential for industries like healthcare or finance that handle sensitive data and comply with standards like SOC 2, ISO 27001, or HIPAA.
Key Steps:
-
Prerequisites:
- Ensure you have an active Azure subscription with Contributor or Owner role.
- Use Standard or Premium namespace tiers.
- Gather public IPv4 addresses or CIDR ranges for allowed systems.
-
Configuration Methods:
- Azure Portal: Use a visual interface to set IP rules.
- Azure CLI: Automate with commands like
az servicebus namespace network-rule-set. - PowerShell: Use cmdlets like
Set-AzServiceBusNetworkRuleSetfor scripting.
-
Advanced Options:
- Add Virtual Network rules for private access.
- Use ARM templates for scalable configurations.
- Enable Trusted Microsoft Services for seamless integrations.
-
Best Practices:
- Set the default action to Deny.
- Use WebSockets over port 443 to avoid issues with blocked AMQP ports.
- Transition from port 9354 to 5671/5672 or 443 before September 2026.
-
Troubleshooting:
- Test connectivity with tools like
telnetortnc. - Enable Azure Monitor logs for detailed insights.
- Test connectivity with tools like
Bottom line: Firewall rules protect your Service Bus, ensure compliance, and maintain secure communication. Follow these steps to lock down your messaging infrastructure effectively.
Azure Service Bus Firewall Configuration: 5-Step Setup Process
Prerequisites for Setting Up Firewall Rules
Before diving into the configuration of firewall rules for Azure Service Bus, it’s important to check a few key requirements. These steps ensure you have the right permissions, the correct namespace tier, and the necessary network details to set up everything securely.
Azure Subscription Requirements
First, you need an active Azure subscription with the right permissions. Specifically, your account should have either the Contributor or Owner role at the Service Bus namespace level. These roles are essential for making network configuration changes.
In organizations with strict access controls, double-check that your account includes the Microsoft.ServiceBus/namespaces/networkrulesets/write permission. This specific permission is required to adjust firewall and network rule settings. Without it, you won’t be able to update any firewall configurations.
Namespace Tier Considerations
Firewall rule capabilities depend on your Service Bus namespace tier. Both the Standard and Premium tiers support firewall rules, but their features vary:
- Standard Tier: Supports IP-based firewall rules, allowing you to control access by specifying IPv4 addresses or CIDR ranges. This is ideal for managing external access.
- Premium Tier: Offers advanced networking options, including virtual network (VNet) integration. This lets you connect your Service Bus namespace directly to an Azure Virtual Network, adding extra layers of security and isolation. If your setup requires private endpoints or service endpoints, the Premium tier is necessary.
IP Addresses and CIDR Ranges
For IP-based firewall rules, you’ll need to gather the public IPv4 addresses of the systems or services that will connect to your Service Bus namespace. This includes application servers, on-premises systems, or any external services involved in sending or receiving messages.
Decide whether to use individual IP addresses or CIDR ranges. For instance, if you have multiple servers within the same subnet, you can simplify management by using a CIDR range like 203.0.113.0/24 instead of listing each IP separately. Make sure these addresses are static or that you have a process to update them as your infrastructure evolves.
sbb-itb-79ce429
How to Configure Firewall Rules
After ensuring your prerequisites are met, you can start setting up firewall rules using one of three methods: the Azure Portal, Azure CLI, or Azure PowerShell. Each approach applies the same security policies, so the choice depends on your preference or workflow.
Configuring Firewall Rules in Azure Portal
The Azure Portal offers a visual way to set up firewall rules. Begin by navigating to your Service Bus namespace and selecting Networking from the left-hand menu.
Important: Firewall settings are available only with the Standard or Premium tiers.
Under the Public network access section, switch the setting from All Networks to Selected Networks. This limits access to the specific IP addresses you define. In the Firewall section, you can click Add client IP address to include your current IP address or manually input IPv4 addresses or CIDR ranges. To keep track of your rules, give each one a descriptive name. Once you've entered the necessary details, click Save to apply the changes.
If you'd rather automate this process, consider using Azure CLI or PowerShell.
Using Azure CLI for Firewall Configuration
For those who prefer command-line tools, Azure CLI makes automation straightforward. Start by setting the default action to Deny, which blocks all traffic unless explicitly permitted:
az servicebus namespace network-rule-set update --resource-group YourResourceGroup --namespace-name YourNamespace --default-action Deny
To allow access from a specific server, such as one with the IP 198.51.100.10, use the following command:
az servicebus namespace network-rule-set ip-rule add --resource-group YourResourceGroup --namespace-name YourNamespace --ip-rule ip-address=198.51.100.10 action=Allow
You can repeat this command with different IP addresses or CIDR ranges to add multiple rules. To review your current rules, run:
az servicebus namespace network-rule-set show
Using Azure PowerShell for Firewall Rules
Azure PowerShell offers a similar level of control with cmdlets tailored for Service Bus network management. Start by creating an IP rule configuration object using the New-AzServiceBusIPRuleConfig cmdlet:
$ipRule = New-AzServiceBusIPRuleConfig -IPMask "203.0.113.0/24" -Action Allow
Next, assign this rule to your namespace with the Set-AzServiceBusNetworkRuleSet cmdlet:
Set-AzServiceBusNetworkRuleSet -ResourceGroupName YourResourceGroup -NamespaceName YourNamespace -IPRule $ipRule -DefaultAction Deny
If you need to configure multiple IP ranges, create additional $ipRule objects and pass them as an array to the Set-AzServiceBusNetworkRuleSet cmdlet. This approach works well for integrating with automation scripts and streamlining your firewall management.
Advanced Firewall Configurations
Once you've set up basic firewall rules, these advanced configurations can help you fine-tune security and control over your Service Bus namespace.
Setting Up Virtual Network Rules
Virtual network rules allow you to restrict access to your Service Bus namespace by specifying subnets. This method ensures traffic stays within your private network instead of relying solely on public IPs.
To connect a virtual network to your Service Bus namespace, you'll need to enable the service endpoint for Microsoft.ServiceBus on your subnet. In the Azure Portal, go to your subnet settings, enable the Microsoft.ServiceBus service endpoint, and then navigate to the Service Bus Networking settings to add a virtual network rule. Select the appropriate subscription, virtual network, and subnet to complete the setup.
Using ARM Templates for Firewall Configuration
ARM templates make it easy to manage network rules by defining them all in a single JSON file. Use the resource type Microsoft.ServiceBus/namespaces/networkRuleSets to configure both IP rules and virtual network rules in one deployment.
To enforce a strict firewall policy, set the defaultAction property to Deny. This ensures all traffic is blocked unless explicitly allowed. Use the ipRules property to specify an array of objects, each containing an ipMask (a single IPv4 address or CIDR range) and an action. For virtual network rules, include the virtualNetworkRules property with the resource ID of the subnet.
Allowing Trusted Microsoft Services
The Trusted Microsoft Services feature enables specific Azure services to bypass firewall restrictions, which is crucial for certain integration scenarios. This feature is available on the Premium tier and requires a managed identity along with proper RBAC (Role-Based Access Control) assignments. Access isn't granted by default.
To enable this feature, go to the Networking blade of your Service Bus namespace and set "Allow trusted Microsoft services to bypass this firewall" to Yes. Supported services - such as Azure Event Grid, Azure Stream Analytics, and Azure IoT Hub - must authenticate using a managed identity with the Azure Service Bus Data Sender role. Keep in mind, Azure App Service and Azure Functions require Virtual Network Integration instead of using this bypass. If you're using ARM or Bicep templates, set the trustedServiceAccessEnabled property to true within the networkRuleSets resource.
| Trusted Service | Supported Usage Scenarios |
|---|---|
| Azure Event Grid | Allows Event Grid to send events to Service Bus queues or topics using a managed identity. |
| Azure Stream Analytics | Enables jobs to output data to Service Bus entities. Requires "Data Sender" permissions. |
| Azure IoT Hub | Routes messages to Service Bus queues or topics with identity-based authentication. |
| Azure API Management | Sends messages to Service Bus via custom workflows or as a backend using managed identity. |
| Azure Digital Twins | Egresses data to Service Bus topics for event routing or data history. |
| Azure Synapse | Uses Workspace Managed Identity to send, receive, or manage Service Bus data. |
These configurations enhance your firewall's capabilities, ensuring your messaging infrastructure is both secure and compliant with integration requirements.
Best Practices and Troubleshooting
Firewall Rule Best Practices
To strengthen the security of your Service Bus namespace, follow these practical guidelines for configuring firewall rules.
Start by setting the default action to Deny, ensuring all traffic is blocked unless explicitly permitted. After updating IP rules or virtual network settings, test connectivity from the relevant clients or services to confirm everything is functioning as intended.
Keep your IP allowlist as lean as possible - only include addresses that absolutely require access. When working in the Azure Portal, use the "Add your client IP address" shortcut to reduce the risk of manual entry errors, especially during local testing. For production setups, document the purpose of each IP address to simplify future audits and troubleshooting.
Important: Port 9354 will no longer be supported after September 2026. Transition to AMQP (5671/5672) or HTTPS/WebSockets (443) right away to avoid service disruptions.
If your corporate firewall blocks AMQP ports, configure your Service Bus clients to use WebSockets over port 443. This option is typically compatible with standard network restrictions and ensures smoother connectivity.
For persistent issues, even after implementing these best practices, refer to the troubleshooting tips below.
Troubleshooting Common Issues
If connection problems arise after setting up firewall rules, start with basic checks to rule out common causes. Use tools like wget or curl to access https://<yournamespace>.servicebus.windows.net/. A 400 Bad Request response confirms that the namespace is reachable, meaning the issue likely isn't with the firewall rules. However, if the request times out or fails, it's a strong indicator that your IP address isn't on the allowlist.
To verify port accessibility, try the following:
-
On Windows, use PowerShell:
tnc <yournamespace>.servicebus.windows.net -port 5671 -
On Linux, use
telnetfor the same check.
For intermittent connectivity problems, run the following command to identify packet loss or dropped connections:
.\psping.exe -n 25 -i 1 -q <yournamespace>.servicebus.windows.net:5671
If a connection is rejected due to firewall rules, Service Bus typically returns an "unauthorized" error, though it won't directly indicate that an IP rule caused the issue.
For cases involving Trusted Microsoft Services, ensure the bypass setting is enabled. Also, confirm that any Azure service (e.g., Event Grid or Stream Analytics) has a managed identity assigned with the Azure Service Bus Data Sender role.
Enable client-side logging for additional insights by using the Azure-Messaging-ServiceBus source in .NET. Additionally, configure Azure Monitor Diagnostic Settings to gather operational logs. These logs can reveal whether API calls were blocked or if there are configuration errors. Remember, the Resource health page in the Azure Portal may have a slight delay (5-10 minutes) in reflecting the current status due to its evaluation process.
Conclusion
Setting up Azure Service Bus firewall rules is a smart way to tighten security by restricting access to specific IP addresses or private networks. This approach not only minimizes potential vulnerabilities but also supports compliance with industry regulations.
For industries that must adhere to stringent data protection standards, tools like IP filtering, Virtual Network endpoints, and Private Link work alongside identity-based authentication to provide layered security. Together, they help meet requirements for frameworks such as HIPAA, SOC 2, and ISO 27001.
The Premium tier of Azure Service Bus offers advanced capabilities, including Private Endpoints and Network Security Perimeters (currently in public preview). These features ensure traffic stays within the Microsoft backbone network, enhancing both isolation and compliance.
AppStream Studio specializes in delivering secure, production-ready Azure solutions tailored for mid-market businesses. By modernizing event-driven architectures, they help organizations achieve measurable outcomes on the Microsoft platform. For more information, visit https://appstream.studio.
To uphold security and compliance, make sure to rigorously test your configurations and document every IP rule you implement.
FAQs
Will firewall rules block Azure Service Bus if my public IP changes?
When setting up firewall rules for Azure Service Bus, you can base them on specific IP addresses or IP ranges. However, if your public IP address changes, access to the service may be disrupted unless you manually update the firewall rules with the new IP.
To avoid this hassle, consider using Microsoft-managed service tags. These tags automatically adapt to any IP address changes, ensuring seamless and uninterrupted access to Azure Service Bus without requiring constant updates.
Should I use IP rules, VNet rules, or Private Endpoints for Service Bus?
The choice you make hinges on your specific security requirements and how your network is configured:
- IP rules: These allow you to limit access to specific IP addresses or ranges. They're a great option for controlling access from on-premises systems or trusted external sites.
- VNet rules: With service endpoints, you can restrict access to particular Azure virtual networks. This option is available exclusively in the Premium tier.
- Private Endpoints: For the highest level of security, private endpoints use private IP addresses within your virtual network. This feature is also limited to the Premium tier.
How can I avoid client disruptions when switching from port 9354 before September 2026?
To avoid potential disruptions, make sure to update your firewall rules to account for the new IP ranges and ports. Specifically, configure support for AMQP over ports 5671 or 5672 with TLS. Using service tags like "ServiceBus" can simplify managing Azure-managed IPs.
Switching to DNS-based rules is another smart move - it makes future updates much easier to handle. Keep a close eye on IP and DNS changes, and ensure all necessary updates are completed before the September 2026 deadline.