Azure DevOps Release Pipelines: Best Practices
Want to streamline your deployments in Azure DevOps? Here’s the key: use YAML pipelines, set up clear stages, and adopt secure practices. This article covers everything you need to know to optimize your release pipelines for speed, reliability, and compliance.
Key Takeaways:
- YAML Pipelines: Prefer YAML over Classic UI for version control, code reviews, and reusable templates.
- Stages: Keep stages simple (e.g., Build, Test, Staging, Production) and use clear naming conventions.
- Artifact Management: Build once, deploy everywhere. Use
PublishPipelineArtifactfor faster uploads. - Security: Manage secrets with Azure Key Vault and enforce role-based access.
- Testing & Rollback: Automate tests at every stage and plan robust rollback procedures for quick recovery.
By following these practices, you can reduce errors by 50% and achieve deployment lead times of under an hour. Let’s dive into the details.
Day-5/16 Azure DevOps Release Pipelines | Blue Green Deployment | Azure DevOps Zero to Hero series
sbb-itb-79ce429
Planning and Structuring Release Pipelines
A well-designed release pipeline is the backbone of reliable deployments and compliance. At its core, the pipeline's structure ensures that the artifact tested in QA is the exact one deployed to production. By maintaining this consistency, you eliminate the risk of environment mismatches.
Setting Up Stages and Environments
Keep your pipeline stages simple - ideally between 3 and 5, such as Build, Test, Staging, and Production. Overcomplicating with additional stages can lead to unnecessary complexity and hidden failures [2]. In the Azure DevOps UI, explicitly define environments to manage approvals and checks before deployments begin [4].
Adopt a clear naming convention for environments, like [Project]-[Component]-[Environment]. For instance, ShopCart-API-Staging provides clarity and consistency [2]. When configuring production environments, enforce branch filters to ensure only production-ready code is deployed [4]. Use an exclusive lock with "latest only" behavior to prevent outdated commits from being deployed if multiple changes are queued [4].
"If you are deploying anything beyond a toy project and you are not using environments, you are leaving safety and visibility on the table." - Grizzly Peak Software [4]
Always opt for the deployment job type instead of a standard job. This unlocks advanced features, including lifecycle hooks (preDeploy, deploy, routeTraffic, postRouteTraffic) and deployment strategies like runOnce, rolling, or canary, giving you precise control over updates [4].
Once your stages are defined, focus on configuring artifact sources and triggers to streamline the deployment process.
Selecting Artifact Sources and Triggers
The principle here is simple: build once, deploy everywhere. By building a single artifact for all environments, you ensure faster compilation and guarantee that the artifact tested in QA is identical to the one deployed to production [3]. Set up continuous deployment triggers with branch filters targeting refs/heads/main. Alternatively, use scheduled triggers for tasks like nightly builds or extensive testing [4].
For production releases with higher stakes, consider a canary deployment strategy. This approach allows you to route a small portion of traffic - starting with 10%, then increasing to 25% - to the new version before a full rollout. This minimizes risk while gradually introducing changes [4]. If your pipelines depend on one another, use pipeline resource triggers with trigger: true and optional stage or tag filters to coordinate workflows across multiple repositories.
After setting up your artifact sources and triggers, it's essential to maintain a clear distinction between build and release processes.
Separating Build and Release Pipelines
Separating the build and release pipelines keeps things modular and easier to manage [3]. The build pipeline should focus on compiling code, running unit tests, and publishing artifacts. The release pipeline, on the other hand, handles environment-specific configurations, secret management, and the actual deployment process.
"Building is the entire process of generating a package which is to be deployed. Releasing it is sending that package to be deployed and in most cases, even deploying it." - Ross McQuillan, Senior Lead Developer [3]
Avoid modifying configuration files during the build process. Instead, handle file transformations and variable injections in the release pipeline [3][5]. If your frontend and backend teams operate on different deployment schedules, create separate pipelines for each. This prevents a single, overly complex YAML file from becoming a bottleneck [2]. Modern multi-stage YAML pipelines let you define Build, Test, and Deploy as separate stages with dependsOn relationships, offering logical separation even within a unified file [5][1].
Managing Artifacts and Deployment Agents
When refining your pipeline structure, it's crucial to focus on artifact management and agent selection. These elements play a key role in improving both deployment speed and reliability.
Configuring Artifact Downloads and Versioning
Switch to PublishPipelineArtifact and DownloadPipelineArtifact. These modern tasks significantly outperform their legacy counterparts. For example, uploading a 450MB file drops from 3 minutes and 40 seconds to just 48 seconds [6].
"Use
PublishPipelineArtifactandDownloadPipelineArtifactfor all new pipelines. The legacy tasks still work, but the performance difference is substantial."
– Grizzly Peak Software [6]
Only download what’s necessary. By default, deployment jobs in multi-stage pipelines download all artifacts, which can waste time and resources. To avoid this, use - download: none and explicitly specify the artifacts needed for each stage [6]. For instance, in Node.js projects, you can publish only the dist folder and package.json, then run npm ci --production during deployment. This simple adjustment can reduce artifact size from 280MB to just 62MB [6]. Additionally, include a .artifactignore file to exclude unnecessary files like node_modules, test results, or source code, further cutting down upload and download times.
Stick to a consistent artifact naming convention. Use a format like {component}-{type} (e.g., api-build) and avoid embedding timestamps or version numbers. This practice simplifies artifact tracking and ensures consistency across environments [6].
By following these guidelines, your artifact management strategy will align more effectively with your deployment goals. Once your artifacts are optimized, the next step is choosing the right type of deployment agent.
Choosing Between Self-Hosted and Microsoft-Hosted Agents
For deployments requiring specialized hardware or software, self-hosted agents are the way to go. For most other scenarios, Microsoft-hosted agents are a better choice - they eliminate the need for infrastructure management. To ensure smooth operations, monitor metrics like build durations, failure rates, and queue lengths using Azure Monitor. If your agent pool shows signs of being under-provisioned, adjust accordingly. For self-hosted agents, standardize configurations to minimize variability between environments [7].
Using Parallel Jobs
Parallel jobs can significantly cut down pipeline runtime by running tasks simultaneously, provided you have enough agents available. You can set job limits under "Agent pools → Settings" in Azure DevOps and monitor queue lengths and wait times to ensure your agent pool is properly sized. However, keep in mind that excessive parallelism on shared infrastructure can lead to resource contention, which may hurt performance. Balance your parallelism strategy carefully, especially when considering the costs of additional agent licenses or infrastructure [7].
Meeting Security and Compliance Requirements
For industries like healthcare and finance, where regulations are strict, securing your release pipelines isn’t just a good practice - it’s a must. Configuring your systems correctly can be the difference between acing an audit or dealing with expensive compliance issues.
Securing Secrets with Variable Groups
Centralize secret management by linking variable groups to Azure Key Vault. This setup ensures a single source of truth while providing audit trails. To enhance security, use role-based access controls by creating separate variable groups for each environment, such as Production-Secrets and Staging-Secrets. This separation helps avoid the risk of production credentials being mistakenly used in development.
Stick to a regular rotation schedule of 30 to 90 days for secrets to align with security best practices [8].
Prevent queue-time overrides. Enable the "Limit queue-time variable overrides" option in your project or organization settings. This prevents users from injecting harmful values when starting a pipeline. Additionally, turn on "Enable shell tasks arguments parameter validation" to protect against command injection vulnerabilities.
| Feature | Variable Group (Standard) | Variable Group (Key Vault Linked) |
|---|---|---|
| Storage Location | Azure DevOps (Encrypted) | Azure Key Vault |
| Secret Management | Manual updates in DevOps UI | Centralized management in Key Vault |
| Rotation Support | Manual | Automated rotation policies available |
| Audit Logging | Azure DevOps Audit Logs | Key Vault Diagnostic Logs + DevOps Logs |
| Access Control | DevOps Permissions | Azure RBAC + DevOps Permissions |
By managing secrets effectively, you lay the groundwork for scaling compliance across your infrastructure.
Using Infrastructure as Code
Leverage Infrastructure as Code (IaC) tools like Terraform or ARM templates to codify technical controls for compliance frameworks like HIPAA. These tools can automate the provisioning of environments with encryption, network safeguards, and monitoring, minimizing manual errors and configuration drift [9]. You can also integrate automated secret rotation into your IaC scripts to stay aligned with compliance requirements.
Here’s a real-world example: From February 2024 to April 2025, Dedicatted, a consulting firm, assisted a U.S.-based digital healthcare provider in migrating from AWS to Microsoft Azure. To maintain HIPAA compliance, they used a GitOps-driven approach with GitHub workflows and Terraform. For every development branch, the system provisioned secure, isolated, and temporary environments with built-in encryption, private subnets, and firewalls. These environments were destroyed automatically after branch merges, ensuring compliance while avoiding service disruptions for thousands of users [9].
Require code reviews for infrastructure changes. Set branch policies to mandate at least two reviewers for repositories containing IaC scripts. This step ensures security standards are met and reduces risks tied to compromised accounts [10].
"Microsoft provides security of the cloud, it's up to you to configure security in the cloud" [10].
It’s worth noting that by 2025, 99% of cloud security failures are expected to result from customer misconfigurations, not provider issues [10].
Avoiding Hardcoded Values
Strengthen your IaC practices by parameterizing all values. Replace hardcoded values with variable syntax like $(api-key). For user-configurable settings, use parameters instead of variables. Parameters allow for specific data types (e.g., number or string) and can be restricted to predefined value ranges.
Use the settableVariables YAML attribute to control which variables can be modified during runtime, reducing the risk of unauthorized changes. Additionally, implement build validation policies to run secret-scanning tools like Gitleaks during pull requests. This helps catch hardcoded secrets before they make it into production.
"Hard-coding values in your pipeline can lead to maintainability issues, especially when configurations differ between environments or change over time" [11].
Organizations that adopt centralized templates report 50% fewer errors and can onboard new projects three times faster [1]. Whenever possible, eliminate the need for long-lived credentials by using workload identity federation or managed identities instead of secrets.
Monitoring, Testing, and Rollback Procedures
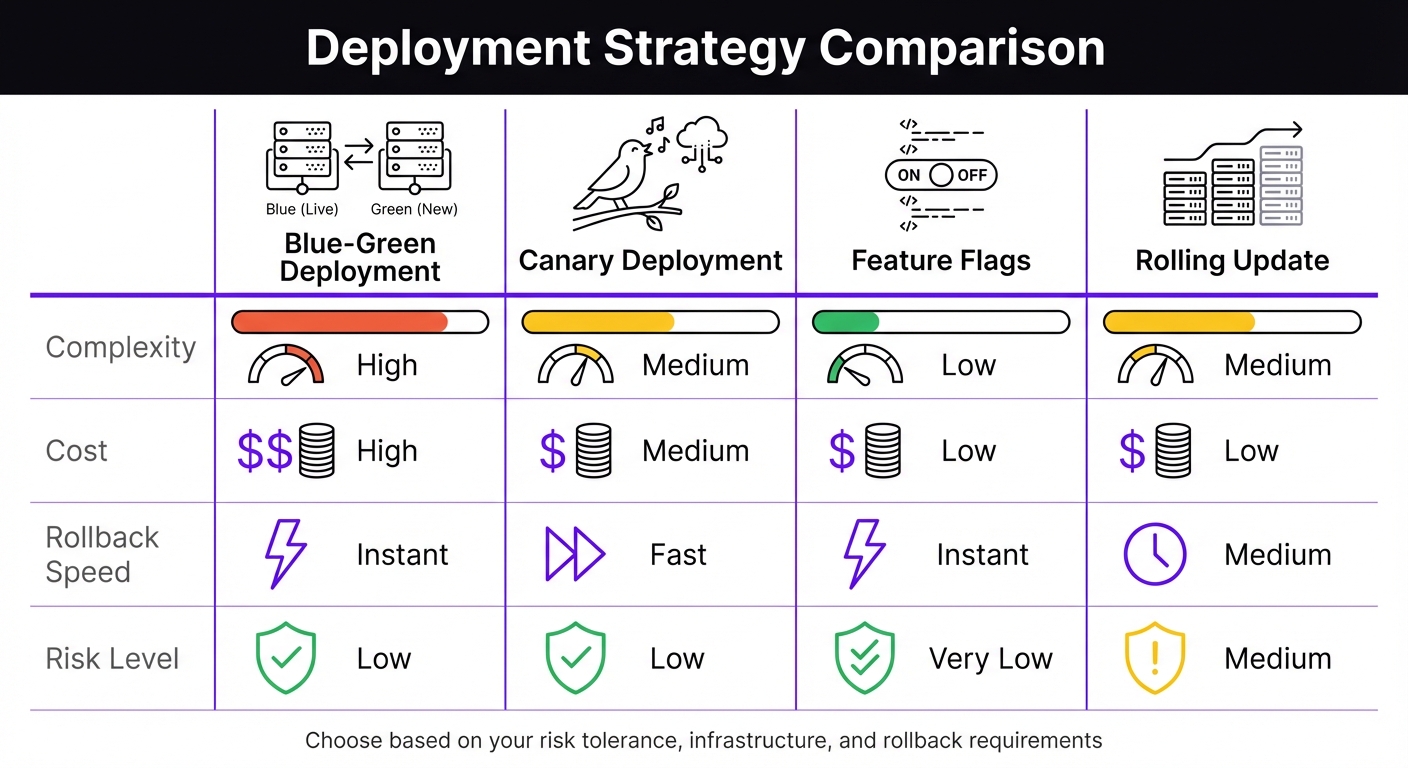
Azure DevOps Deployment Strategies Comparison: Blue-Green vs Canary vs Feature Flags vs Rolling Update
Managing artifacts effectively goes hand-in-hand with having solid monitoring and rollback plans. These strategies ensure deployment processes are both reliable and resilient. A release pipeline is only as good as your ability to detect and address issues early. Top-performing teams excel at verifying, monitoring, and preparing for potential failures.
Automating Tests Across Stages
Divide testing into stages: unit/integration, security, and end-to-end tests. Start with unit and integration tests during the build phase to catch logic errors. Then, integrate security scans - like SAST and SCA - as mandatory gates before moving forward. Finally, run UI and end-to-end tests in staging environments using tools such as Playwright.
Parallelize test execution to save time. By sharding test suites, you can distribute tests across multiple agents, significantly reducing execution time. For instance, a 50-minute suite can be cut down to just 10 minutes [1]. According to the DORA 2024 Report, elite DevOps teams deploy on demand, maintain lead times under an hour, and achieve change failure rates below 5% [1]. Tools like CodeAnt.ai can further optimize testing by running only those tests impacted by recent code changes, cutting suite execution times by about 30% [2].
After every deployment, automate health checks to verify the application status. A /health endpoint can confirm the application is functioning properly before advancing to the next stage.
Once testing ensures code integrity, quality gates provide an additional layer of security.
Setting Up Quality Gates
Implement compliance thresholds with "Approvals and Checks." Use automated tools like SonarQube for code quality and OWASP for dependency checks. Additionally, require manual approval from at least two authorized individuals for production deployments.
Enforce exclusive locks for production releases. Configure an "Exclusive Lock" with "Latest only" behavior to ensure only the most recent commit proceeds if multiple runs are queued. You can also restrict deployment activities to business hours and enforce branch controls, allowing only the main branch to deploy to production [4].
Forward deployment logs to a Log Analytics workspace. Use KQL to diagnose issues like identifying the "Top 5 slowest tasks" [12].
When quality gates detect problems, a strong rollback strategy ensures quick recovery.
Planning Rollback and Recovery
Automate rollbacks using YAML pipeline lifecycle hooks. Use the on: failure trigger to execute automated recovery scripts or restore databases if a deployment fails [4]. While classic release pipelines include built-in rollback options, YAML pipelines require manual setup using deployment jobs and failure handlers [13].
"The best rollback is the one you never need, but the worst situation is needing one you don't have." - Shraddha Mahapure, DevOps Engineer [14]
Mitigate risks with deployment rings. Start with a small traffic shift using a canary deployment. Monitor for error spikes with Azure Monitor alerts, particularly for resultCode != 200 patterns [2]. If issues arise, consider rolling back a small percentage of users rather than reverting the entire production environment.
For infrastructure changes, Azure Resource Manager templates include a "Rollback on error" flag that redeploys the last known good state. However, database schema rollbacks can be more challenging. Use backward-compatible migrations and feature flags to introduce schema changes without disrupting existing functionality [13].
| Strategy | Complexity | Cost | Rollback Speed | Risk Level |
|---|---|---|---|---|
| Blue-Green | High | High | Instant | Low |
| Canary | Medium | Medium | Fast | Low |
| Feature Flags | Low | Low | Instant | Very Low |
| Rolling Update | Medium | Low | Medium | Medium |
Regularly test rollback procedures in staging environments. Simulate failures to validate automated recovery scripts. This ensures you're prepared for real-world incidents when they occur.
Summary and Next Steps
The strategies we've covered lay the groundwork for creating reliable Azure DevOps release pipelines. Success hinges on a few key principles: clear stages, robust automated testing, secure handling of secrets, and well-thought-out rollback plans. Teams that follow these practices often see impressive results - like lead times under an hour and change failure rates below 5% [1]. Achieving these outcomes requires treating pipelines as code and adhering to the "build once, deploy everywhere" approach.
Key Recommendations
Start with the basics before diving into more complex setups. Begin by creating a simple pipeline that performs essential tasks: checking out code, restoring dependencies, building, and running unit tests [2]. As Toxigon aptly puts it:
"Your first pipeline should be boring. Like, 'why are we even automating this' boring." [2]
Once the foundation is solid, you can expand by integrating features like security scans, parallel jobs, and phased rollouts. Organizations using centralized pipeline templates report fewer errors - 50% fewer, to be exact - and can onboard new projects three times faster [1].
Focus your optimizations where they’ll have the most impact. For example:
- Pipeline caching: Saves 40–60% of build time for dependencies like npm or NuGet.
- Parallel execution: Speeds up test suites by 60–70% [1].
For secrets management, Azure Key Vault is a go-to option. Additionally, use deployment gates with manual approvals for production and enforce branch policies that require at least two reviewers before merging [1].
Don’t overlook rollback procedures. Regularly test recovery scripts in staging environments to ensure they work before a real production issue arises. As Toxigon emphasizes:
"If the pipeline fails, you fix it before merging, no exceptions." [2]
With these recommendations in hand, you’re ready to take the next step in refining your pipeline.
Getting Started
Start small and build up gradually. If you haven’t already, transition to YAML pipelines. Store your pipeline definitions in Git, validate changes through pull requests in feature branches, and separate pipelines for components with different deployment schedules [2].
Take an iterative approach rather than overhauling everything at once. As Ross McQuillan, Senior Lead Developer, explains:
"CI/CD release pipelines are never perfect and can always be improved. Always start small and think how can you achieve the next step." [3]
Identify one pain point - whether it’s slow builds, manual approvals, or inconsistent deployments - and tackle it step by step. Pipelines that focus on doing one thing well, without unnecessary complexity, are more likely to stand the test of time.
FAQs
How do I migrate from Classic release pipelines to YAML safely?
To ensure a smooth migration, begin by documenting every feature, task, variable, and configuration in your Classic pipeline. Where possible, export tasks to simplify the process, but be prepared to manually recreate them in YAML. Once the YAML pipeline is set up, test it rigorously by running it alongside the Classic version. This parallel testing helps verify that everything functions as expected. Transition gradually to minimize disruptions and maintain stability, aligning your workflows with modern DevOps practices.
What’s the best way to handle environment-specific config without rebuilding artifacts?
To handle environment-specific configurations in Azure DevOps without the hassle of rebuilding artifacts, it's important to separate secrets and configurations from the build artifacts. A great way to do this is by using Azure Key Vault for securely storing and managing sensitive data like API keys or connection strings. Pair this with Variable Groups to manage environment-specific settings.
This setup ensures your sensitive data stays protected while allowing you to adjust configurations for different environments easily. Plus, it eliminates the need to rebuild or redeploy your artifacts whenever changes are required.
How can I design a reliable rollback for database and infrastructure changes?
To create a dependable rollback strategy in Azure DevOps release pipelines, focus on incremental releases with built-in quality gates. This approach allows you to catch issues early by gradually exposing changes to users. Incorporate automated health checks to monitor deployments in real-time and pause them if problems arise.
Use Azure DevOps tools like release history and version control to plan and manage rollbacks effectively. Automate critical rollback steps, such as restoring database snapshots or redeploying previous artifacts, to reduce downtime and prevent errors during the process.