Azure Cosmos DB Encryption: Customer-Managed Keys Setup
Azure Cosmos DB offers encryption at rest and in transit, but with Customer-Managed Keys (CMKs), you gain full control over your data security. CMKs let you manage your encryption keys through Azure Key Vault or a Managed HSM, providing flexibility for compliance, key rotation, and access control. This guide covers how to set up CMKs effectively, ensuring your data stays secure while meeting regulatory requirements.
Key Takeaways:
- Why CMKs?: Meet compliance standards (e.g., HIPAA, PCI DSS) and revoke access instantly when needed.
- Setup Overview:
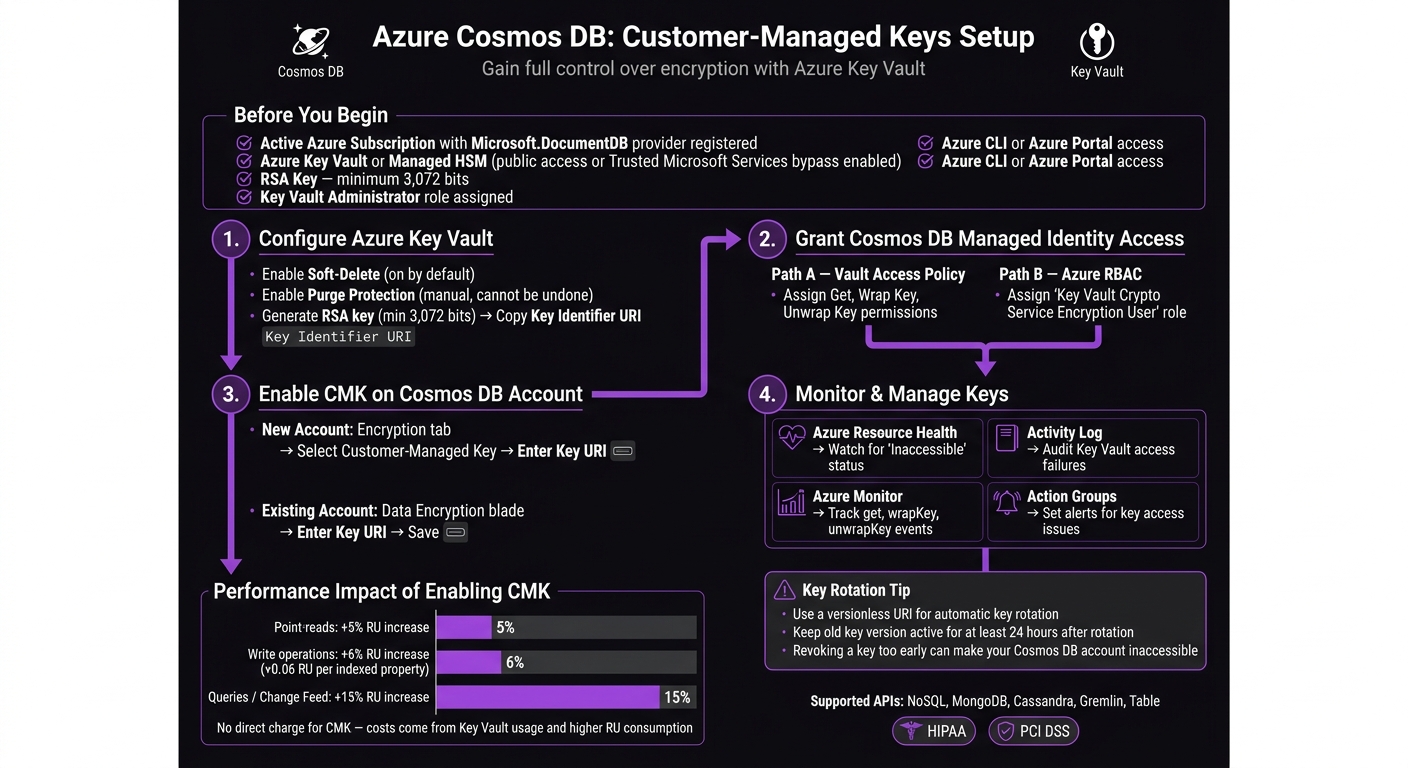
- Enable Soft-Delete and Purge Protection in Azure Key Vault.
- Create an RSA key (minimum 3,072 bits).
- Assign necessary permissions to Cosmos DB's managed identity.
- Link the Key Vault to your Cosmos DB account.
- Impact: Slight increase in RU consumption (~5-15%) and Key Vault usage costs.
- Monitoring: Use Azure tools like Resource Health and Monitor to track key usage and address issues quickly.
By following these steps, you can enhance control over your encryption keys while maintaining a secure and compliant environment for your Cosmos DB data.
Azure Cosmos DB Customer-Managed Keys Setup: Step-by-Step Guide
Prerequisites for Customer-Managed Keys Setup
Before diving into the configuration process, make sure all necessary services, tools, and permissions are ready to go. Overlooking this step is one of the most common reasons why CMK setups fail or stall midway.
Required Azure Services and Tools
To get started, you'll need an active Azure subscription with the Microsoft.DocumentDB resource provider registered. Beyond that, ensure the following are in place:
- Azure Key Vault (or a Managed HSM) - Your encryption keys must be stored in an Azure Key Vault (or Managed HSM). This vault must allow public network access or be configured to permit access from trusted Microsoft services. Keep in mind that a vault restricted to private endpoints cannot be used for Cosmos DB CMKs [1].
- Azure CLI or Azure Portal - Either tool can be used to complete the setup steps.
- An RSA key with a minimum size of 3,072 bits - Smaller key sizes are not supported for this setup [1].
It's worth noting that enabling CMKs will slightly increase RU consumption. Here's the breakdown:
- Point-reads: ~5% increase
- Writes: ~6% increase, plus ~0.06 RU for each indexed property
- Queries or Change Feed reads: ~15% increase [1]
While Azure Cosmos DB doesn't charge extra for enabling CMKs, you'll see additional costs due to Key Vault usage and the higher RU consumption [1].
Required Permissions and Roles
Having the correct permissions is critical. At a minimum, the individual performing the setup must have the Key Vault Administrator role assigned to the Key Vault instance. This role is necessary for managing the vault and assigning roles [1].
| Required Role | Target Resource | Purpose |
|---|---|---|
| Key Vault Administrator | Azure Key Vault | Manage the Key Vault and assign roles [1] |
Be sure this role is assigned before starting the configuration. Proceeding without the right permissions can lead to errors that are often hard to resolve once the process is underway.
Once these prerequisites are confirmed, you're ready to configure your Azure Key Vault for CMKs.
sbb-itb-79ce429
Step 1: Configure Azure Key Vault for Customer-Managed Keys
Before you dive into the setup, it’s essential to ensure Azure Key Vault is configured correctly to store encryption keys for Cosmos DB. Without proper configuration, the Customer-Managed Keys (CMK) setup won't function.
Enable Soft-Delete and Purge Protection
To use Azure Key Vault with Cosmos DB for CMKs, soft-delete and purge protection must be enabled. These features are non-negotiable.
| Feature | Purpose | Default State | Can Be Disabled? |
|---|---|---|---|
| Soft-delete | Allows recovery of deleted keys within a retention period | Enabled by default | No |
| Purge Protection | Prevents permanent deletion of keys until the retention period ends | Disabled by default | No |
While soft-delete is on by default in newer Key Vault instances, purge protection requires manual activation. Once enabled, purge protection cannot be turned off - this ensures keys cannot be permanently deleted, even by administrators, while Cosmos DB relies on them.
To enable purge protection, use the Azure CLI with the following command:
az keyvault update --name <your-vault-name> --resource-group <your-rg> --enable-purge-protection true
Once purge protection is active, you’re ready to create your encryption key.
Generate and Store Encryption Keys
Now, create an RSA key with a minimum size of 3,072 bits. Depending on your setup, you’ll use either an RSA or RSA-HSM key. Here’s the command to generate the key:
az keyvault key create --vault-name <your-vault-name> --name <your-key-name> --kty RSA --size 3072
For environments using a Managed HSM, replace --kty RSA with --kty RSA-HSM. After generating the key, make sure to copy the Key Identifier URI - this will be required when configuring the Cosmos DB account later.
Below is a summary of the key requirements for Cosmos DB:
| Property | Requirement for Cosmos DB |
|---|---|
| Key Type | RSA (or RSA-HSM for Managed HSM) |
| Key Size | Minimum 3,072 bits |
| Soft-Delete | Must be enabled |
| Purge Protection | Must be enabled |
| Network Access | Public or Trusted Microsoft Services bypass |
Keep in mind that Azure Key Vault’s pricing applies for storing keys and performing cryptographic operations. However, there are no additional charges specific to Cosmos DB for this setup.
Step 2: Grant Cosmos DB Managed Identity Access to Key Vault
Now that you've set up Key Vault and generated the encryption key, the next step is to grant Cosmos DB access through its managed identity. This identity - whether system-assigned or user-assigned - requires explicit permissions to handle encryption tasks.
Assign Key Vault Access Policies
Azure Key Vault offers two permission models: Vault Access Policies and Azure Role-Based Access Control (RBAC). Keep in mind, you can only use one model at a time.
| Permission Model | What to Assign | Scope |
|---|---|---|
| Vault Access Policy | Key Permissions: Get, Wrap Key, Unwrap Key |
Key Vault instance |
| Azure RBAC | Role: Key Vault Crypto Service Encryption User |
Key Vault resource |
| Managed HSM (RBAC) | Role: Managed HSM Crypto Service Encryption User |
/keys |
To ensure Cosmos DB can retrieve and securely use the Data Encryption Key (DEK), you must assign all three key permissions: Get, Wrap Key, and Unwrap Key. Even one missing permission will disrupt the connection.
For those using Vault Access Policies, you can assign these permissions via the Azure CLI. First, retrieve the principalId of Cosmos DB's managed identity, then execute the following command:
az keyvault set-policy \
  --name <your-vault-name> \
  --object-id <cosmos-db-managed-identity-principal-id> \
  --key-permissions get wrapKey unwrapKey
If you're using Azure RBAC instead, assign the Key Vault Crypto Service Encryption User role to the managed identity at the Key Vault resource scope. Make sure the managed identity granted these permissions matches the one configured for Cosmos DB. A mismatch is a frequent cause of errors in the next step.
If permissions are mistakenly removed, the Cosmos DB account will enter a "revoked" state. In this state, the only actions allowed are deleting the account or updating the identity. To resolve this, restore the permissions and allow 1–2 hours for access to be reinstated.
Once permissions are in place, you're ready to enable customer-managed keys for your Cosmos DB account in the next step.
Step 3: Enable Customer-Managed Keys on a Cosmos DB Account
Now that your managed identity is set up, it’s time to enable Customer-Managed Key (CMK) encryption for your Cosmos DB account. You can apply this either during account creation or to an existing account.
Create a New Cosmos DB Account with CMKs
Before you begin, ensure the Microsoft.DocumentDB resource provider is registered in your subscription. If it’s not, the deployment will fail.
When creating a new Cosmos DB account in the Azure Portal, go to the Encryption tab. Select Customer-managed key and input your Key Vault Key Identifier URI. Leave out the version string to make key rotation easier [1].
If you prefer using CLI, PowerShell, or ARM templates, here’s how:
- CLI: Use the
az cosmosdb createcommand with the--key-uriparameter. - PowerShell or ARM templates: Set the
keyVaultKeyUriproperty and explicitly define thelocationsproperty [1]. For ARM templates, ensure you use API version 2019-12-12 or later.
Note: If you’re planning to use continuous backup, you must configure a managed identity (either system-assigned or user-assigned) in the Key Vault access policy. First-party identities won’t work for continuous backup with CMK [1].
Enable CMKs on an Existing Cosmos DB Account
You can add CMK encryption to an existing Cosmos DB account without needing to recreate it. This applies to accounts using NoSQL, MongoDB, Cassandra, Gremlin, or Table APIs, provided they use the standard Azure Key Vault [1].
To enable CMKs in the Azure Portal, open your Cosmos DB account, navigate to the Data Encryption blade in the left-hand menu, enter the Key URI, and save.
For CLI, use the az cosmosdb update command with the --key-uri parameter. If you’re using PowerShell, update the keyVaultKeyUri property and apply it using Set-AzResource.
Be aware that enabling CMK will increase Request Unit (RU) consumption due to encryption and decryption processes. Here’s a breakdown of the RU impact:
| Operation Type | RU Increase |
|---|---|
| Point-reads (by ID) | +5% per operation |
| Write operations | +6% per operation (~+0.06 RU per indexed property) |
| Queries / Change Feed | +15% per operation |
While there’s no direct charge for enabling CMK itself, you’ll need to account for these RU increases and any standard Azure Key Vault usage fees when planning your capacity [1].
Step 4: Manage and Monitor Customer-Managed Keys
Once you've enabled Customer-Managed Keys (CMKs), the work doesn't stop there. Ongoing management of security, rotation, and monitoring is critical to ensure smooth operations.
Key Rotation Best Practices
Rotating your CMK doesn’t mean re-encrypting all your data - it simply re-wraps the Data Encryption Key (DEK). This process minimizes performance impact while maintaining security.
To make key updates seamless, configure a versionless URI. By leaving the key version out of the URI, Azure Cosmos DB will automatically use the latest key version after rotation - no manual updates needed!
If you’re rotating keys manually, keep the old key version active for at least 24 hours. This buffer ensures that background processes have time to transition. Revoking the old key too quickly could result in access errors.
Note: Rotating a DEK used in Always Encrypted or client-side encryption is more complex. It involves creating a container with a new encryption policy and migrating your data. This isn’t a simple key swap.
For Always Encrypted scenarios, use the RewrapClientEncryptionKey method in the .NET, Java, or JavaScript SDKs. This method wraps the existing DEK with the new CMK, simplifying the process.
These steps build on your initial CMK setup and help keep encryption secure and efficient.
Monitor Key Usage and Access
Proactive monitoring is essential to catch issues early and maintain the integrity of your keys. Use the following tools to stay on top of key usage:
| Monitoring Tool | Purpose | What to Watch |
|---|---|---|
| Azure Resource Health | Database availability | Displays "Inaccessible" if key access is lost |
| Activity Log | Operational auditing | Logs failures when access to Key Vault is denied |
| Azure Monitor | Security auditing | Tracks get, wrapKey, and unwrapKey events |
| Action Groups | Incident response | Sends alerts based on specific log events |
Focus on Azure Monitor for Key Vault audit logs, particularly for get, wrapKey, and unwrapKey operations. These events cover all interactions Cosmos DB has with your key. Any unusual activity - like spikes or gaps in these logs - should be investigated immediately.
Set up Azure Resource Health alerts to notify your team if a Cosmos DB account becomes inaccessible due to a lost key protector. If a key expires and access is revoked, your first step should be to un-expire the key in Key Vault. Typically, Cosmos DB will restore access within one to two hours after the key is reactivated.
Additionally, regularly check the customerManagedKeyStatus property on your Cosmos DB account. If it shows a revoked status, act quickly to resolve the issue before it affects users.
Troubleshooting Common Customer-Managed Key Issues
Even with proper configuration, issues with customer-managed keys can still arise. This section outlines common problems and their solutions to help maintain smooth encryption operations in Cosmos DB.
Fix Key Revocation Errors
Key revocation errors occur when Cosmos DB loses access to your encryption key in Azure Key Vault. This can happen if the key has expired, been deleted, or if the Key Vault becomes unreachable. To confirm this issue, check your Cosmos DB account status for "revoked."
| Error Scenario | Common Root Cause | Recommended Fix |
|---|---|---|
| Account shows "Inaccessible" in Resource Health | Key expired or deleted in Key Vault | Renew or restore the key, then wait up to 2 hours for recovery |
revoked status on Cosmos DB account |
Misconfigured access policies or disabled key | Re-enable the key and ensure access policies are correctly configured |
| Cosmos DB cannot access Key Vault | Firewall or private endpoint misconfiguration | Update Key Vault's network settings to allow Cosmos DB's managed identity |
| Purge protection not enabled | Key was permanently deleted | Restore from backup if available; if not, the account cannot be recovered |
Debug Managed Identity Permission Issues
To ensure Cosmos DB can authenticate with Azure Key Vault, the managed identity must have specific permissions: get, wrapKey, and unwrapKey. Depending on your setup, Cosmos DB may use either a system-assigned or user-assigned managed identity.
| Permission Model | Required Configuration |
|---|---|
| Access Policies (legacy) | Assign get, wrapKey, and unwrapKey permissions to the Cosmos DB managed identity |
| Azure RBAC (recommended) | Assign the "Key Vault Crypto Service Encryption User" built-in role to the managed identity |
Conclusion and Key Takeaways
Setting up customer-managed keys for Azure Cosmos DB gives you direct control over encryption keys, enhancing data security.
The process starts with configuring Azure Key Vault correctly. Make sure soft-delete and purge protection are enabled, use an RSA key with at least 3,072 bits, and assign the right permissions to a managed identity (ideally user-assigned). Then, link the Key Vault URI to your Cosmos DB account.
Be aware that enabling customer-managed keys can lead to higher RU consumption. Adjust your throughput capacity accordingly to maintain performance.
After rotating keys, keep old versions for at least 24 hours to allow internal systems enough time to transition fully. Deleting a key prematurely could make your account inaccessible.
Finally, set up continuous monitoring using tools like Azure Resource Health, Key Vault audit logs, and Activity Log alerts. This ensures you can address issues proactively, balancing security with smooth performance.
FAQs
Can I use a private endpoint-only Key Vault with Cosmos DB CMKs?
Yes, it’s possible to use a private endpoint-only Azure Key Vault with Cosmos DB when managing customer-managed keys (CMKs). Azure Key Vault serves as the secure storage for your CMKs and supports private endpoint access. This setup relies on access policies and managed identities to ensure secure communication.
To make this work seamlessly, ensure that your Key Vault is configured correctly to support the integration with Cosmos DB. This includes setting up the necessary access permissions and enabling private endpoint access.
What happens if my Key Vault key is deleted, expired, or access is revoked?
If your Key Vault key is deleted, expires, or has its access revoked, your Azure Cosmos DB account will go into a revoke state. In this state, data operations such as reading or writing are restricted until access is restored. To fix this, you’ll need to either update the permissions or reconfigure the key access to get everything working again.
How do I rotate my CMK without downtime or re-encrypting data?
When using Azure Cosmos DB, you can update your customer-managed key (CMK) without causing downtime or needing to re-encrypt existing data. To do this, create a new version of the key in Azure Key Vault and update your Cosmos DB account to reference the updated key. This process ensures uninterrupted operations. Any new data will be encrypted with the updated key, while existing data stays encrypted with the previous key version until it is automatically re-encrypted.