
You can build a .NET document pipeline that reads invoices, receipts, IDs, tax forms, and fixed-format business forms without manual typing. In this guide, I walk through the full path: create the Azure resource, connect the .NET SDK, run prebuilt or custom extraction, map fields into C# models, score output with confidence checks, and send weak results to review.
Here’s the short version:
- I use Azure AI Document Intelligence to pull text, tables, and fields from documents.
- I connect from .NET with
Azure.AI.DocumentIntelligence. - I use prebuilt models for common files like invoices and receipts.
- I train a custom model when the layout is fixed and prebuilt output is not enough.
- I keep confidence scores with each field and route low-score results for review.
- I use Microsoft Entra ID with
DefaultAzureCredentialfor production. - I keep secrets in environment variables or Azure Key Vault.
- I add retry, logging, queueing, and access controls before go-live.
A few points matter most:
- If you want Entra ID auth, use a custom subdomain endpoint, not a regional one.
- For review rules, the guide uses clear cutoffs: 0.80–1.00 auto-process, 0.50–0.79 review, and below 0.50 reject.
- For finance files, I don’t trust confidence alone. I also check math, like line-item totals against the document total.
- In production, I reuse one client instance, avoid logging raw field values, and separate intake, analysis, and review with queues.
Quick comparison
| Option | Best use | Setup | Auth fit |
|---|---|---|---|
| Prebuilt models | Invoices, receipts, IDs, tax forms, layout | Low | API key or Entra ID |
| Custom model | Fixed company forms | More setup due to labeling and training | API key or Entra ID |
| Regional endpoint | Key-based access | Simple | No Entra ID |
| Custom subdomain endpoint | Production with managed identity | Best for Azure-hosted apps | Yes |
If you need a plain way to turn document files into typed .NET data with review and production controls, this guide gives you that path.
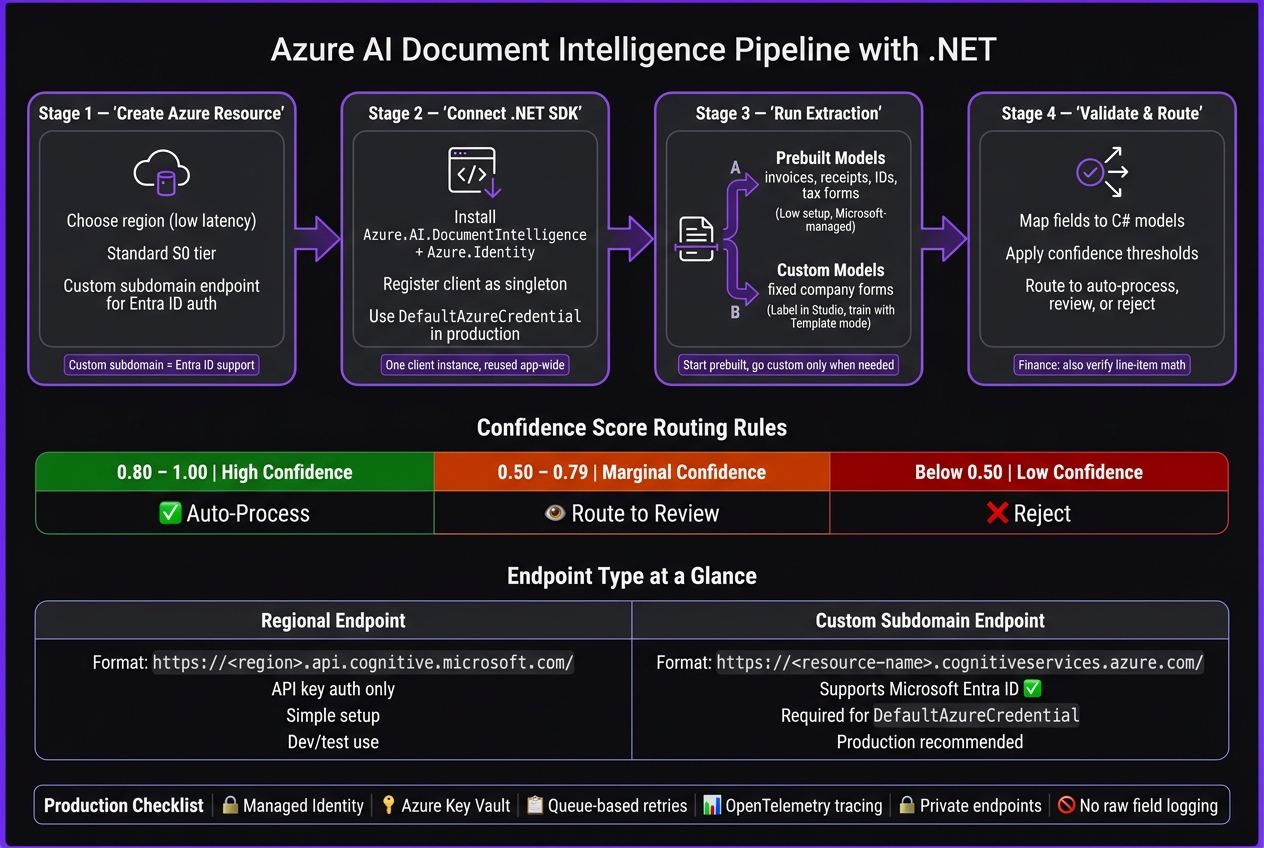
Azure AI Document Intelligence Pipeline: From Setup to Production
Document Processing with Azure AI Document Intelligence: Ultimate Guide!
sbb-itb-79ce429
Step 1: Create the Azure AI Document Intelligence resource
Before you write any .NET code, create an Azure AI Document Intelligence resource in the Azure portal. During setup, pick your subscription, resource group, region, and pricing tier. It also helps to put this resource in its own resource group, since that makes cost tracking and cleanup much easier.
Choose a region, pricing tier, and access method
Pick a region close to your app to cut latency [3]. For production use, choose the Standard (S0) tier [2][5].
Your access method matters because the two endpoint formats do not work the same way [1]:
| Endpoint Type | Format | Supports Microsoft Entra ID |
|---|---|---|
| Regional | https://<region>.api.cognitive.microsoft.com/ |
No |
| Custom Subdomain | https://<resource-name>.cognitiveservices.azure.com/ |
Yes |
Use a custom subdomain endpoint if you want Microsoft Entra ID authentication. Use a regional endpoint if you're using an API key. If you plan to use DefaultAzureCredential with managed identity in production, you must use the custom subdomain endpoint. For production, use identity-based authentication [1][4].
Store the endpoint and credentials safely
After you create the resource, copy the endpoint URL and one of the API keys. Don't hard-code either one. For local development, store them in environment variables. For production, use Azure Key Vault or managed identity. If you're using Microsoft Entra ID auth, assign the Cognitive Services Data Reader role to the service principal [1][4].
With the resource ready and auth sorted out, the next step is to install the .NET SDK and send your first analysis request.
Step 2: Add the .NET SDK and analyze documents with built-in models
Install packages and set up the client
Start by adding two NuGet packages to your project:
dotnet add package Azure.AI.DocumentIntelligence
dotnet add package Azure.Identity
Add Azure.AI.DocumentIntelligence and Azure.Identity. Use Azure.Identity only if you authenticate with DefaultAzureCredential [1][4].
Create a single DocumentIntelligenceClient and reuse it across your app. In production, register it as a singleton [1].
// Production: identity-based auth
var client = new DocumentIntelligenceClient(
    new Uri(Environment.GetEnvironmentVariable("DOCUMENT_INTELLIGENCE_ENDPOINT")),
    new DefaultAzureCredential());
That setup keeps things simple. You create the client once, then let the rest of the app use it instead of spinning up a new client for every request.
Run built-in analysis for text, tables, and layout structure
Azure AI Document Intelligence comes with built-in models for layout, tables, and common document types. Pick the model ID that fits the file you want to analyze: use prebuilt-layout for layout structure and tables, and prebuilt-invoice for business documents like invoices [1][4].
Here’s a small example that sends a document for analysis and reads back fields and tables:
var operation = await client.AnalyzeDocumentAsync(
    WaitUntil.Completed,
    "prebuilt-invoice",
    new AnalyzeDocumentContent { UrlSource = new Uri("https://your-storage/invoice.pdf") });

AnalyzeResult result = operation.Value;

foreach (AnalyzedDocument doc in result.Documents)
{
    if (doc.Fields.TryGetValue("VendorName", out DocumentField vendorField))
        Console.WriteLine($"Vendor: {vendorField.ValueString}");
}

foreach (DocumentTable table in result.Tables)
{
    foreach (DocumentTableCell cell in table.Cells)
        Console.WriteLine($"[{cell.RowIndex},{cell.ColumnIndex}] {cell.Content}");
}
This is the basic flow: send the file, wait for analysis to finish, then walk through Documents and Tables in the result. If all you need is vendor names, totals, line items, or table cells, this gets you there fast.
| Model | Best For | Setup Effort | Maintenance |
|---|---|---|---|
prebuilt-layout |
Text, tables, and layout structure | None | Managed by Microsoft |
prebuilt-invoice / prebuilt-receipt |
Standard business documents | None | Managed by Microsoft |
Map the response into application models
Convert extracted values into strongly typed C# models near the service boundary.
When you read fields from AnalyzedDocument.Fields, use TryGetValue so missing values don’t break your code [4]. Check FieldType before reading the typed value, then use the matching property such as ValueString, ValueCurrency.Amount, or ValueDate [4][1].
if (doc.Fields.TryGetValue("Total", out DocumentField totalField)
    && totalField.FieldType == DocumentFieldType.Currency)
{
    invoice.Total = totalField.ValueCurrency.Amount;
    invoice.TotalConfidence = totalField.Confidence;
}
That extra type check matters. It helps you avoid bad reads when a field is present but not in the format your app expects.
Keep the Confidence score alongside the mapped value [1][2]. If a field scores below 0.8, send it to human review before downstream processing.
If a document type needs repeatable field extraction, that’s usually the point where a custom model and workflow rules make more sense.
Step 3: Train custom models and add workflow rules
Build a custom extraction model for fixed document types
When prebuilt models no longer fit your document layout, it’s time to train a custom model for fixed-format forms, reports, and intake sheets. In Document Intelligence Studio, upload sample documents to Blob Storage, grant access with SAS or managed identity, and label each field you want the model to extract. That manual labeling step helps you spot layout gaps and field mismatches before training starts [1][3].
For fixed-layout forms and reports, use Template build mode. In .NET, call BuildDocumentModelAsync on DocumentIntelligenceAdministrationClient, and then use the returned modelId with AnalyzeDocumentAsync [1].
Use
GetResourceDetailsAsyncto monitor custom model storage; S0 has limits [1][7].
Validate output with confidence thresholds and review paths
Once the model is trained, the next step is deciding what happens to each document. A simple way to do that is with confidence thresholds like these [4]:
| Confidence Range | Status | Action |
|---|---|---|
| 0.80 – 1.00 | High confidence | Auto-process |
| 0.50 – 0.79 | Marginal confidence | Route to review |
| Below 0.50 | Low confidence / unreliable | Reject |
For financial documents, add business rules on top of model confidence. Check line-item totals against Total, and flag any mismatch no matter how high the score looks. A strong confidence score doesn’t mean the math is right.
If a required field is missing, send the document to an exception path. The same goes for a failed lookup on a key field like InvoiceTotal - route it out right away [4]:
if (!document.Fields.TryGetValue("InvoiceTotal", out DocumentField totalField))
{
    // Route to review or exception handling
    return;
}

if (totalField.Confidence < 0.8)
{
    // Route to review
    return;
}
For high-volume pipelines, Azure Durable Functions work well at this stage. They let you pause a document for review without holding up the rest of the batch, then continue after approval. That keeps review and recovery inside the same pipeline [8][9].
Also, wrap AnalyzeDocumentAsync in a try-catch for RequestFailedException. Use error codes like InvalidRequest and InvalidContent to decide whether the document should be retried, rejected, or sent down a recovery path [1][7].
Step 4: Deploy, secure, and run the pipeline in production
Harden security and data handling
Once extraction, mapping, and review are in place, production controls decide whether the pipeline can scale safely.
After validation and review rules are set, lock down the pipeline before deployment.
In production, use DefaultAzureCredential instead of AzureKeyCredential. Apply least privilege by assigning the Cognitive Services Data Reader role to the managed identity and Storage Blob Data Reader for Blob Storage access. Store any API keys or connection strings in Azure Key Vault instead of hardcoding them or leaving them in plain-text config files. In regulated setups, private endpoints keep service traffic off the public internet [1][6][8].
Logging needs extra care. AnalyzeResult can contain sensitive document data, so mask or leave out field values before they reach Application Insights or any other log sink. Use AzureEventSourceListener or Azure Monitor for SDK diagnostics, and never log raw document values [1][10].
Deploy with monitoring, retries, and handoff in mind
Once access and data handling are secure, shift to runtime behavior, retries, and observability.
Host intake and analysis in Azure Functions or Azure Container Apps, and use Azure Queue Storage to separate upload, analysis, and review [8].
Register DocumentIntelligenceClient once and reuse it across requests. For observability, use OpenTelemetry and send traces to Application Insights. Track throughput, accuracy, and failure rate so you can spot where the pipeline is healthy and where it needs work [1][8][10].
For production handoff, Azure Bicep or azd templates help make environment setup repeatable and consistent [8].
Conclusion: From pilot to production
Production readiness comes from the controls around extraction, not extraction alone. Use managed identity with custom subdomain endpoints, start with prebuilt models like prebuilt-invoice, and add custom models only when a fixed document type needs fields that prebuilt models can't extract with enough consistency [1][3][7][10].
Validation, confidence thresholds, and review paths are what turn a demo into something you can trust in production. Pair those with private endpoints, Key Vault, logging controls, and queue-based retries, and the pipeline can run with fewer surprises in regulated environments [1][6][8][10]. Extraction, validation, and operational controls should be designed together, not bolted on later.
FAQs
When should I use a custom model instead of a prebuilt one?
Use prebuilt models for common document types like invoices, receipts, ID cards, and business cards.
Use a custom model when you need to pull data from specific document layouts, custom field values, or table formats that prebuilt models don't support. If you also need to tell one document type from another, use a custom classification model.
Why do I need a custom subdomain endpoint for Entra ID auth?
A custom subdomain endpoint is required because Microsoft Entra ID authentication doesn't work with standard regional endpoints.
Here's why: regional endpoints are shared by many resources in the same region. Because of that, they don't have the one-of-a-kind identifier needed for identity-based access.
To use Entra ID, create a single-service resource with its own custom subdomain endpoint. After that, you can use the Azure Identity library - such as DefaultAzureCredential - to handle secure sign-in in your .NET application.
How should I handle low-confidence extraction results?
Use the API response’s Confidence property for fields or model outputs, then compare it with a threshold like 0.8. That gives you a simple rule: if the score falls below the threshold, send the result for manual review or a second validation step.
For more complex cases, bring in outside evaluation tools such as AccuracyEvaluator or use the logprobs parameter from OpenAI models to check extraction quality.


