Best Practices for Migrating MongoDB to Azure
Migrating MongoDB to Azure offers faster response times, automatic scaling, and reduced infrastructure management. Key steps include assessing your current setup, planning migration goals, and choosing between online (minimal downtime) or offline (snapshot-based) migration methods. Use tools like Azure Database Migration Service (DMS) for larger datasets or native MongoDB tools for smaller ones.
Quick Overview:
- Plan Ahead: Document databases, collections, shard keys, and workload needs.
- Choose Migration Type: Online (via DMS) for live replication or offline (mongodump/mongorestore) for planned downtime.
- Prepare Azure: Set up Azure Cosmos DB, enable Server Side Retry, and configure security (e.g., VNets, encryption).
- Post-Migration: Verify data integrity, optimize indexes, and monitor performance using Azure tools.
For secure and efficient migrations, ensure compliance, select the right shard keys upfront, and continuously monitor your database after migration.
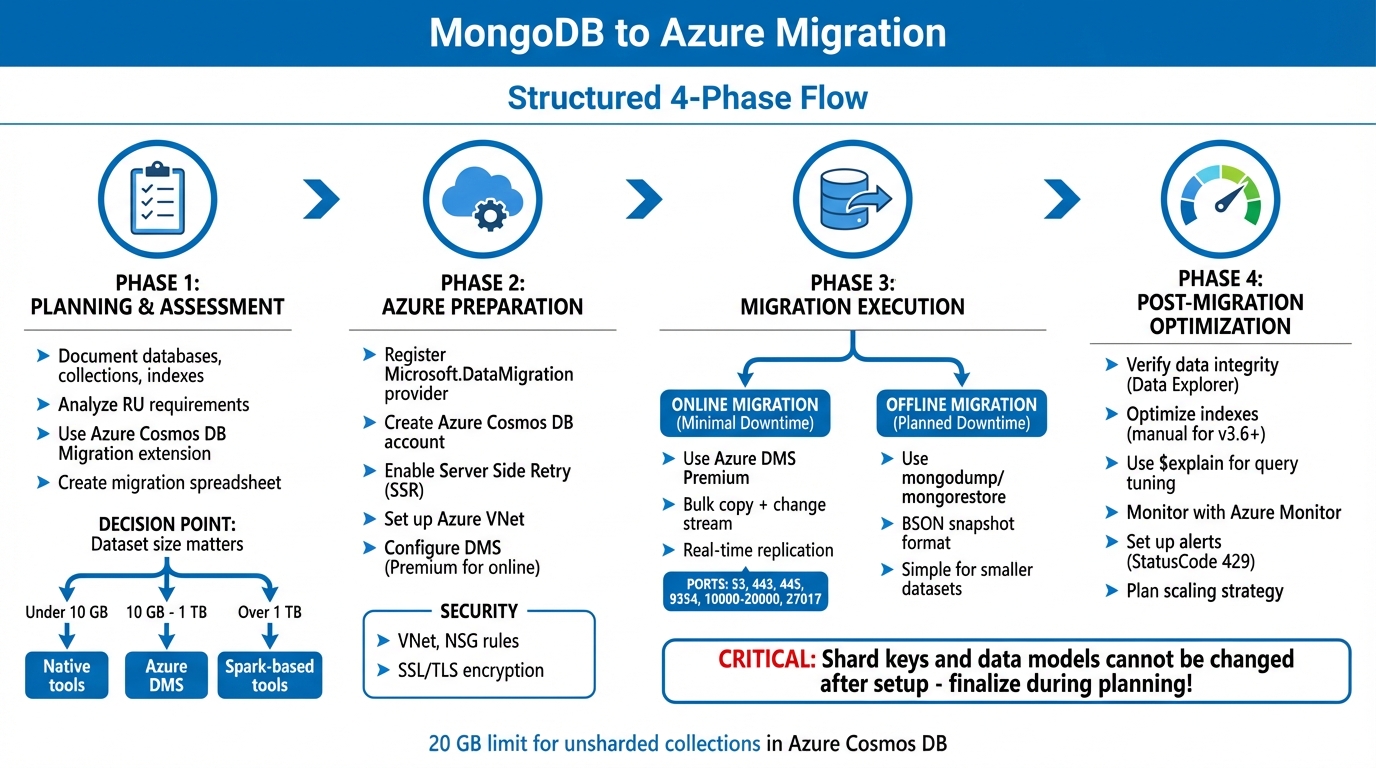
MongoDB to Azure Migration Process: 4 Key Phases
Planning and Assessment Before Migration
Assess Your Current MongoDB Environment
Start by taking a detailed inventory of your current MongoDB setup. Document everything - databases, collections, indexes (unique, compound, TTL), schema designs, and workload requirements. This will give you a solid baseline to plan your Azure environment effectively.
Next, analyze your current request rates, vCore or vCPU usage, and server configurations to estimate the Request Units (RUs) you'll need in Azure. Keep in mind that Azure Cosmos DB has a 20 GB limit for unsharded collections, so if your datasets exceed this size, you'll need to plan for sharding right from the beginning.
To streamline the process, use the Azure Cosmos DB Migration extension in VS Code. This tool identifies any feature or syntax mismatches between your MongoDB Query Language (MQL) and Azure Cosmos DB. It also generates a list of necessary adjustments, helping you avoid surprises during the migration. Organize your findings in a migration spreadsheet with columns for resource names, data sizes, shard keys, data models, and assigned responsibilities.
Define Migration Goals and Strategy
Once your environment is assessed, set clear migration objectives. Do you need minimal downtime? Are you focusing on performance or cost? Your priorities will guide the migration strategy - online migration for minimal downtime (using change streams for live replication) or offline migration for a snapshot-based approach that requires planned downtime.
For smaller workloads under 10 GB, MongoDB native tools like mongodump and mongorestore are sufficient. For datasets between 10 GB and 1 TB, the Azure Database Migration Service (DMS) is a better option, though online migrations require the Premium pricing tier. For workloads over 1 TB, consider using Spark-based tools.
Before diving into a full migration, test your setup with a proof-of-concept on a non-critical workload. This allows you to validate performance, indexing strategies, and consistency settings. Define what constitutes a "failed deployment" (e.g., high error rates or poor performance) and document rollback procedures. Remember, shard keys and data models in Azure Cosmos DB cannot be changed later, so finalize these decisions during the planning phase.
With your goals and strategies in place, you’ll be ready to prepare your Azure environment.
Address Compliance and Security Requirements
Security is a critical part of migration planning. Use Azure Virtual Network (VNet) with site-to-site connectivity like Azure ExpressRoute or VPN to ensure your data stays off the public internet. Configure Network Security Group (NSG) rules to allow traffic on specific ports, such as 53, 443, 445, 9354, and 10,000-20,000 for DMS, and ensure MongoDB’s default TCP port 27017 is accessible through your local firewall.
Always enable SSL/TLS encryption in your connection strings when writing to Azure Cosmos DB. Ensure your source MongoDB has a user with readWrite permissions available. If your source server uses a self-signed certificate, switch to "Connection String mode" in DMS and append &sslVerifyCertificate=false to maintain the connection.
Before starting the migration, enable the "Server Side Retry" feature in the Azure Cosmos DB portal. This feature helps Azure handle throttle errors automatically, reducing delays and improving migration speed without overloading your tools with manual retries.
Migrating MongoDB applications to Azure Cosmos DB
Preparing Azure for Migration
To prepare Azure for your MongoDB migration, you'll need to set up the necessary resources based on your migration plan and security assessments. Start by registering resource providers and provisioning the target database.
First, register the Microsoft.DataMigration resource provider in your Azure subscription. Without this step, you won’t be able to create a Database Migration Service (DMS) instance. Then, create an Azure Cosmos DB for MongoDB account through the Azure portal. Once created, go to the "Features" section and enable the "Server Side Retry" feature. This feature helps Azure handle throttled requests internally with reduced latency, speeding up your migration process.
Next, set up an Azure Virtual Network (VNet) using the Azure Resource Manager deployment model. This VNet acts as the connection bridge between your source MongoDB and the target Azure Cosmos DB. If your source is on-premises, establish site-to-site connectivity using Azure ExpressRoute or a VPN. For specific port configurations, refer to the Compliance and Security Requirements section.
If you’re migrating BSON or JSON files, create an Azure Storage account and a blob container. For migrations using ExpressRoute with network peering, add service endpoints for the database, storage, and service bus to the DMS subnet.
Configure Azure Database Migration Service (DMS)
Set up your DMS instance in the same Azure region as your target database to reduce latency during data transfer. When creating the instance, specify the service name, subscription, resource group, and region. For online migrations, you’ll need the Premium SKU, but offline migrations can use lower tiers.
Create a new migration project by selecting "MongoDB" as the source and "Azure Cosmos DB for MongoDB" as the target. DMS supports three connection modes for your source database:
- Standard mode: Use the Fully Qualified Domain Name (FQDN) or IP address.
- Connection string mode: Ideal for setups with self-signed certificates. Just append
&sslVerifyCertificate=falseto the connection string. - Data from Azure storage: Use this mode for BSON or JSON dumps stored in a blob container.
During the mapping phase, match your source databases to the target ones. If a target database doesn’t exist, DMS can create it for you. When configuring collection settings, DMS provides default Request Units (RUs) ranging between 500 and 4,000 RUs. For sharded collections, a minimum of 1,000 RUs is required. If you haven’t chosen a partition key during planning, using _id as the shard key is a practical option for better throughput.
After setting up DMS, select the storage option that aligns with your workload.
Choose Your Target Storage Option
Azure provides two main options for hosting MongoDB workloads: Azure Cosmos DB for MongoDB (RU-based) and Azure DocumentDB.
Azure Cosmos DB for MongoDB operates on a throughput-based model measured in Request Units (RUs). It’s ideal for applications needing global distribution, multi-region writes, and elastic scalability. This service ensures single-digit millisecond response times with SLA-backed availability. However, unsharded collections are limited to 20 GB of storage. For scaling, Cosmos DB uses automatic sharding and horizontal distribution.
"OpenAI relies on Azure Cosmos DB to dynamically scale ChatGPT, enabling high reliability and low maintenance for one of the fastest-growing consumer applications ever." - Microsoft
Azure DocumentDB (formerly Azure Cosmos DB for MongoDB vCore) is built on an open-source framework under an MIT license. It offers 99.03% MongoDB compatibility, supporting the wire protocol and BSON. This option is tailored for transactional workloads, real-time analytics, and AI-driven scenarios. Unlike the RU-based model, DocumentDB separates compute from storage, enabling independent scaling. Databases can grow to terabytes before requiring a shard key.
| Feature | Azure Cosmos DB (RU-based) | Azure DocumentDB |
|---|---|---|
| Primary Scaling | Horizontal (Automatic Sharding) | Vertical and Horizontal |
| Capacity Model | Request Units (RUs) | vCore-based (Compute & Storage) |
| MongoDB Compatibility | High (Wire Protocol) | 99.03% (Wire Protocol & BSON) |
| Best For | Low-latency, globally distributed apps | Lift-and-shift, transactional NoSQL |
Choose Azure Cosmos DB if you need instant global distribution and scalability tied to request patterns. Opt for Azure DocumentDB if you want an open-source–aligned architecture with strong compatibility for MongoDB tools like Compass or Shell, or if you prefer vertical scaling without sharding. Both options now support integrated vector databases for AI applications.
Keep in mind that DMS does not currently support migrations to Azure Cosmos DB for MongoDB accounts provisioned in serverless mode. Before making your final decision, use the Azure Cosmos DB Migration extension in Visual Studio Code to check for any incompatibilities or warnings related to your workload.
Running the Migration
After setting up Azure, decide between online or offline migration based on your dataset size and how much downtime your application can handle. Choose the method that aligns with your requirements to transfer your MongoDB data effectively.
Online Migration Using Azure DMS
Online migration utilizes Azure Database Migration Service (DMS) to transfer data with minimal downtime. This process involves three phases: pre-migration, migration, and post-migration. Initially, DMS performs a bulk copy of your data and then uses a change stream to capture updates in real-time.
To use this method, you’ll need Premium Azure DMS. Once the bulk copy is complete, the migration status in the Azure portal will indicate "Replaying." At this stage, DMS continues syncing live data from your source database. When you're ready to finalize the migration, verify that all changes are up to date, then select "Finish" to replay any remaining updates and complete the process.
Make sure your Network Security Group (NSG) rules allow traffic on the required ports: 53, 443, 445, 9354, 10,000–20,000, and TCP port 27017. If Azure Cosmos DB throttles requests due to exceeding the provisioned Request Units per second, DMS will retry automatically. Enabling Server Side Retry (SSR) before starting can significantly cut down migration time by reducing latency from throttling retries.
Offline Migration Using mongodump and mongorestore
For applications that can handle downtime, mongodump and mongorestore are simple and reliable options. These MongoDB tools create a snapshot of your data in BSON format, which is more efficient than JSON or CSV for network transfers.
The process involves two steps: first, use mongodump to export your data; then, use mongorestore to import it into Azure Cosmos DB (or Azure DocumentDB). These tools work with standard MongoDB connection strings and can be run from any machine with network access to both the source and destination. However, note that changes made after the snapshot won’t be included in the transfer.
To minimize latency and avoid firewall issues, it’s recommended to run these tools within the same network as your source MongoDB instance. Also, ensure your MongoDB tools match the version of your source database to avoid compatibility problems. For datasets larger than 1 TB, Azure suggests using more scalable solutions like Spark or Azure Database Migration Service.
Verify Data Integrity After Migration
After completing the migration, use Azure Portal Data Explorer to confirm that your databases and collections match the source, and verify that document counts are consistent. You can also use the getLastRequestStatistics command in the MongoDB Shell to check the Request Unit (RU) charges for sample queries and ensure they’re performing as expected.
Set up diagnostic settings to send logs to Azure Log Analytics or Event Hubs. Monitoring query patterns and frequency during migration can help you catch any consistency issues early. Keep in mind that shard keys and partition keys cannot be changed after they’re set, so double-check their configuration during the planning phase. Once data integrity is verified, you can move on to optimizing performance and monitoring your database.
sbb-itb-79ce429
Performance Optimization and Monitoring After Migration
Once your migration is complete, the next step is to fine-tune performance and keep a close eye on your database. Start by analyzing query patterns and tweaking indexes to reduce Request Unit (RU) consumption. Unlike the Cosmos DB NoSQL API, which indexes all fields by default, Azure Cosmos DB for MongoDB (v3.6+) only automatically indexes the _id field and the shard key. To avoid performance issues, manually create indexes for fields that are frequently queried.
Optimize Indexes and Tune Queries
The $explain command is your go-to tool for identifying inefficient queries. Use it with executionStatistics: true to get a detailed breakdown. Pay attention to the ratio of retrievedDocumentCount to outputDocumentCount. If your database scans significantly more documents than it retrieves, it's a sign that better indexing is needed. Queries consuming over 50 RUs are prime candidates for optimization. The pathsNotIndexed array in the $explain output can also point out fields that may need indexing.
Azure Cosmos DB for MongoDB handles indexes differently than native MongoDB. You can create up to 500 single-field indexes per collection, and the platform can combine multiple single-field indexes to handle a single query predicate - something native MongoDB struggles with. Reserve compound indexes for queries that sort on multiple fields. For filtering, multiple single-field indexes are often a more efficient choice. Wildcard indexes ($**) are particularly useful when dealing with unknown or highly variable fields, offering performance on par with individual indexes.
To keep queries efficient, always include the shard (partition) key in equality filters. This narrows queries to a single physical partition, cutting down on RU consumption and latency. For aggregation pipelines, placing the $match stage early ensures maximum use of indexes. If performance issues persist post-migration, consider running the reIndex command. Check the requiresReIndex property in your collection metadata to see if this is necessary.
Once your queries are optimized, continuous performance monitoring is essential.
Use Azure Monitoring Tools
Azure Monitor is a powerful tool that gathers metrics and logs from all Azure components, with updates every minute. It provides a comprehensive view of your database's health. For a more tailored experience, Azure Cosmos DB Insights offers an interactive dashboard that highlights performance, failures, and operational health. You can also use Metrics Explorer in the Azure portal to track key metrics like throughput, storage, latency, and availability in real time.
Set up alerts to catch issues early, such as "StatusCode 429" (rate limiting) or "Region failed over" events. Enabling Server Side Retry (SSR) in the Azure portal can help by intercepting throttle error codes and retrying internally, which significantly improves response times during high-traffic periods.
"The Server Side Retry feature of Azure Cosmos DB allows the service to intercept throttle error codes and retry with a much lower round-trip time, dramatically improving request response times." - Microsoft Learn
For deeper analysis, Log Analytics lets you use Kusto Query Language (KQL) to troubleshoot complex issues and correlate data across services. Metrics Explorer's splitting feature allows you to break down performance metrics, such as RU consumption or latency, by collection or database. Use Azure Advisor for recommendations on optimizing resources based on usage patterns. If storage utilization exceeds 80%, monitor it closely and consider upgrading the disk SKU size.
Scale for Future Growth
Optimizing for the present is crucial, but planning for future growth is equally important. Azure makes it easy to scale compute resources (vCores and RAM) or storage capacity independently, all without downtime or data rebalancing. For workloads that exceed a single node's capacity, horizontal scaling (sharding) distributes data across multiple physical shards. With Azure DocumentDB, each physical shard can handle up to 32 TB - far exceeding the 4 TB limit of many NoSQL databases. This means a 200 TB workload would require just 7 shards instead of 50.
When choosing a shard key, base your decision on frequent query patterns for read-heavy applications or high cardinality for write-heavy ones. Keep in mind that shard keys are permanent once set. Enable auto-scaling to adjust cluster tiers or storage capacity in real time based on CPU and memory usage. For predictable traffic spikes, pre-scaling clusters programmatically is often more effective than relying solely on auto-scaling, which works best for steady growth.
To further enhance performance, deploy read replicas close to users to reduce latency and distribute read loads. When adding physical shards, use the Mongo shell command (sh.startBalancer()) to redistribute data across the cluster seamlessly. Additionally, enabling in-region High Availability (HA) ensures replica shards are maintained, providing automatic failover support.
How AppStream Studio Simplifies MongoDB to Azure Migration
Migrating MongoDB to Azure requires careful planning and precise technical execution to ensure optimal performance. AppStream Studio takes the complexity out of this process, delivering faster migrations while avoiding common pitfalls. With a team of experienced engineers and automated frameworks, AppStream handles every phase of the migration process efficiently, completing projects within weeks.
AppStream's Cloud Migration Services
Every MongoDB migration with AppStream begins with a detailed discovery phase. Using tools like the Azure Cosmos DB Migration extension for VS Code, the team identifies potential syntax issues, feature gaps, and limitations before moving any data. Once the discovery phase is complete, AppStream creates a custom migration pipeline tailored to your data structures. This automated pipeline generates executable artifacts, making it suitable for large-scale migrations.
For businesses that can't afford downtime, AppStream uses the Premium tier of Azure Database Migration Service (DMS) to perform online migrations. This method employs change streams to replicate live updates, ensuring your applications remain operational until the final switchover. To handle high-volume data loads efficiently, AppStream enables Server Side Retry (SSR), reducing round-trip times. Private endpoints are also configured to keep migration traffic secure within your virtual network. During the planning phase, critical decisions - such as shard key selection, throughput allocation (dedicated or shared), and data model design - are addressed since these choices are fixed once the Azure Cosmos DB resource is created.
Benefits for Mid-Market and Regulated Enterprises
AppStream's approach is particularly well-suited for mid-market organizations and industries like financial services and healthcare, where security, speed, and auditability are essential. Unlike fragmented vendor models, AppStream provides a single, accountable team with deep Microsoft expertise. Using Azure Database Migration Service, the team ensures end-to-end monitoring, tracks replication gaps, and manages throttling automatically - key features for maintaining compliance in regulated environments.
The outcome? Faster migrations, reduced costs, and production-ready performance from the start. Whether you're migrating a 50 GB database or a multi-terabyte sharded cluster, AppStream's engineering team handles every step - from initial assessment to post-migration optimization. This comprehensive approach delivers tangible results, including reduced latency, optimized Request Unit (RU) usage, and scalable infrastructure designed to grow with your business. By integrating these strategies, AppStream ensures a smooth, efficient migration process tailored to your needs.
Conclusion
Moving MongoDB to Azure requires thorough preparation, precise execution, and ongoing fine-tuning. Start with a comprehensive pre-migration assessment using tools like the Azure Cosmos DB Migration extension for VS Code. Make key decisions early, as choices like shard keys, data models, and throughput types are fixed once set.
Depending on your needs, choose an online migration with Azure DMS (Premium tier) to minimize downtime, or go with offline methods (such as mongodump/mongorestore) for non-production workloads. To enhance migration response times, enable Server Side Retry (SSR) in Azure Cosmos DB, which helps manage throttling internally. Once the migration is complete, shift your focus to optimization and consistent monitoring.
After migrating, manually configure additional indexes for MongoDB versions 3.6 and above to avoid performance issues. Use Azure Monitor to keep an eye on database health, adjust consistency levels, and fine-tune global distribution settings as your application scales.
For industries with strict regulations, AppStream Studio offers a streamlined solution. AppStream provides secure migrations in just weeks, managing everything from the initial assessment to post-migration optimization. With a team skilled in Microsoft technologies, they ensure your migration meets compliance requirements while delivering production-ready performance from day one.
Think of migration as a multi-phase journey: plan carefully, select the right tools, secure the setup, and monitor continuously to maintain efficiency. To recap: start with detailed planning, execute using the appropriate migration method, optimize once complete, and monitor consistently to keep your database running smoothly.
FAQs
What’s the difference between online and offline methods for migrating MongoDB to Azure?
The primary distinction between offline and online migration lies in how data is transferred and the effect on application availability.
Offline migration involves moving all data in one go. To do this, the application must be taken offline during the process. While this method is straightforward, it does cause temporary disruptions to operations.
Online migration, in contrast, employs continuous change data capture (CDC) to sync updates as they happen. This keeps downtime to a minimum but requires a more intricate setup.
The choice between these methods depends on factors like how much downtime your system can handle, the complexity of your setup, and the overall size of your data.
What are the best ways to maintain data integrity and optimize performance after migrating MongoDB to Azure?
To ensure your database performs well after migrating MongoDB to Azure, start by setting up indexing policies. These policies can significantly boost query efficiency and speed up data retrieval. Proper indexing is essential for making the most of Azure Cosmos DB's API for MongoDB.
You should also enable multi-region distribution. This helps improve data availability and reduces latency, which is crucial for applications serving users across the globe. Use migration tools to evaluate your workload and address any compatibility issues that could compromise data integrity during the transition.
Lastly, choose the right consistency model for your application's needs and keep a close eye on performance metrics. This approach will help maintain accurate and reliable data while optimizing it for the Azure ecosystem.
What are the key security steps to follow when migrating MongoDB to Azure?
When migrating MongoDB to Azure, keeping your data and systems safe should be a top priority. Begin by locking down your network. Use private endpoints, firewall rules, or VPCs to ensure that only trusted sources can access your database. For added protection, leverage encryption both during data transfer and while it’s stored. Azure supports TLS/SSL for secure data transmission and offers Transparent Data Encryption (TDE) to protect data at rest.
For managing access, take advantage of managed identities. This allows for secure, password-free connections between Azure services, minimizing the chances of credentials being exposed. On top of that, apply role-based access control (RBAC) to ensure users and applications have only the permissions they absolutely need, following the principle of least privilege. Combining these strategies helps create a secure environment and ensures a smooth transition to Azure.