How Azure Logic Apps Simplifies Process Integration
Azure Logic Apps is a cloud-based platform that helps you automate workflows and integrate applications without extensive coding. It uses a visual designer to connect services like Salesforce, SAP, and Microsoft 365 through over 1,400 prebuilt connectors. Here's what makes it useful:
- Automates workflows: Build processes using triggers (start events) and actions (tasks).
- Prebuilt connectors: Integrates with cloud and on-premises systems easily.
- Serverless: Microsoft handles scaling and availability, so you focus on workflows.
- Flexible deployment: Supports both cloud and hybrid setups, including B2B standards like EDIFACT and AS2.
- Monitoring tools: Track performance and troubleshoot with Log Analytics and Application Insights.
Whether you're syncing data, processing orders, or integrating legacy systems, Azure Logic Apps offers a streamlined way to build and manage automation workflows.
Getting Started with Azure Logic App Connectors
Azure Logic Apps Basics
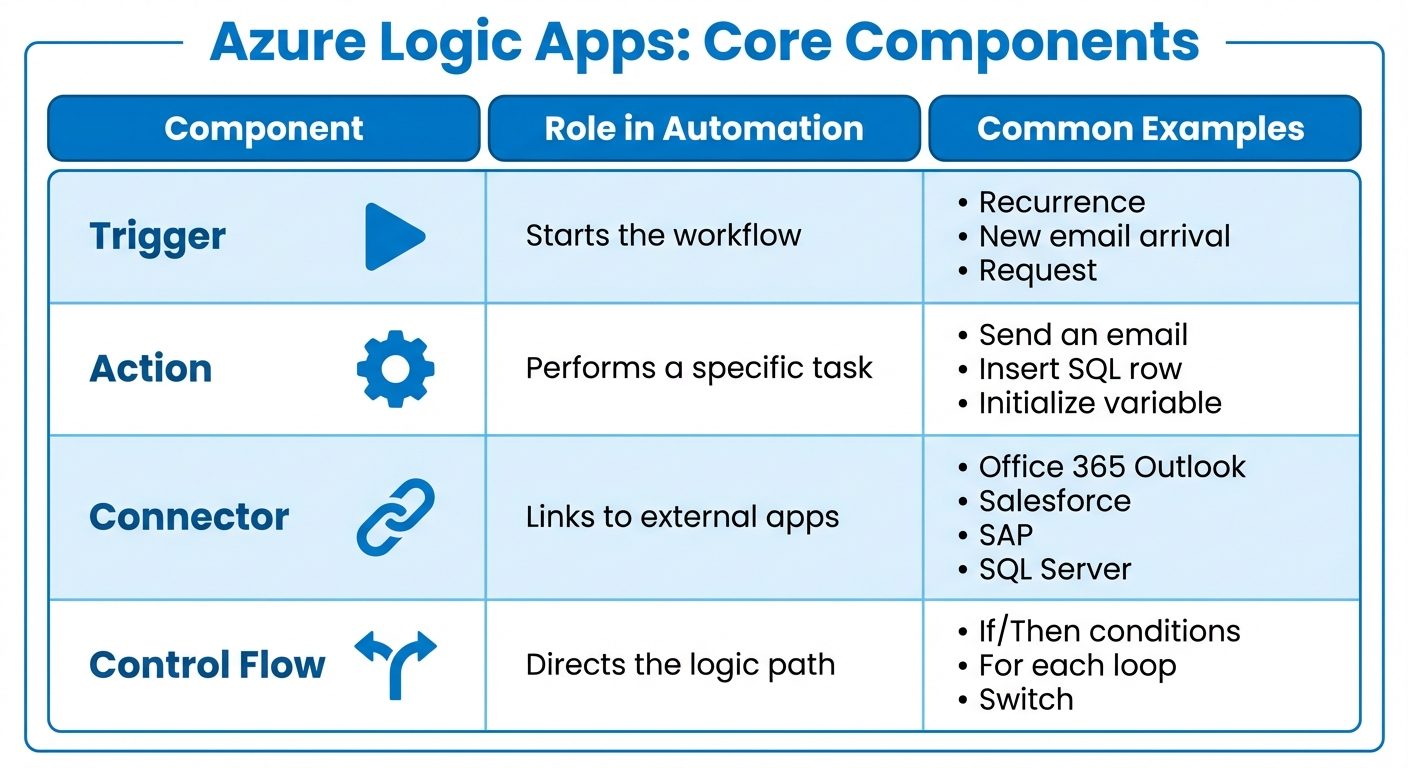
Azure Logic Apps Components: Triggers, Actions, Connectors and Control Flow
Azure Logic Apps operates using four key elements: workflows, triggers, actions, and connectors. These components work together to automate processes, enabling data to flow between systems with minimal custom coding. Let’s break down how each of these elements contributes to automation.
Workflows: The Foundation of Automation
A workflow defines the steps of a business process. It begins with a trigger and progresses through a series of actions, either sequentially or based on conditions.
You can design workflows visually using tools like the Azure portal or Visual Studio Code. With its drag-and-drop interface, Azure Logic Apps makes it easy for both business analysts and developers to create workflows without writing extensive code.
Workflows come in two types:
- Stateful workflows: These store run history and state information, making them ideal for processes that require tracking, audit trails, or error recovery.
- Stateless workflows: These prioritize speed and efficiency, making them a great option for tasks where low latency is critical.
Triggers and Actions: The Building Blocks
Triggers are the starting point of any workflow. They initiate the process, either by polling (checking for updates at regular intervals) or through push mechanisms (like webhooks for immediate execution).
Actions are the individual tasks that follow a trigger. These tasks can include sending an email, updating a database, transforming data, or calling an API. Actions are designed to work in sequence, with each one able to use the outputs from previous steps, creating a smooth flow of information.
| Component | Role in Automation | Common Examples |
|---|---|---|
| Trigger | Starts the workflow | Recurrence, New email arrival, Request |
| Action | Performs a specific task | Send an email, Insert SQL row, Initialize variable |
| Connector | Links to external apps | Office 365 Outlook, Salesforce, SAP, SQL Server |
| Control Flow | Directs the logic path | If/Then conditions, For each loop, Switch |
Connectors: Bridging Applications and Services
Connectors act as the link between your workflow and external applications or services. Microsoft describes them as:
A connector provides one or more prebuilt operations, which you use as steps in your workflow... without writing code.
Connectors come in two forms:
- Built-in connectors: These are embedded directly within the Logic Apps runtime, offering better performance and lower latency. They appear in the "In app" group in the designer.
- Managed connectors: Hosted by Microsoft in Azure, these serve as wrappers around APIs and are listed in the "Shared" group.
Most connectors require a one-time authentication setup, often using OAuth for services like Salesforce or Office 365. Connections are securely stored as encrypted Azure resources. If a prebuilt connector isn’t available for your system, you can create custom connectors or use the generic HTTP action to interact with any REST or SOAP API.
Building Your First Logic App Workflow
To get started, you'll need an active Azure account with a subscription. If you're using the Standard plan, you'll also require an Azure Storage account to store workflow states and artifacts. Additionally, if your workflow involves sending notifications, make sure to set up a supported email account (such as Office 365 Outlook, Outlook.com, or Gmail).
Setting Up in the Azure Portal
Begin by creating a Logic App in the Azure portal. You can choose between two plans:
- Consumption plan: Ideal for pay-per-execution scenarios, offering flexibility without upfront costs.
- Standard plan: Provides fixed pricing and supports multiple workflows, making it suitable for more complex needs.
For Standard apps, once deployment is complete, navigate to Workflows to add stateful or stateless workflows. If you're using the Consumption plan, the Logic App Designer will be available right away, allowing you to start building your workflow immediately.
Once your resource is set up, the next step is to define your process flow by adding triggers and actions.
Adding Triggers and Actions
Every workflow begins with a trigger. For instance, you might use a "Recurrence" trigger to run the workflow on a schedule, or a "Request" trigger to create an HTTP endpoint. Configure the trigger's parameters based on your requirements. Be sure to save your workflow immediately - this step is crucial as it generates endpoint URLs for Request triggers and publishes your changes.
To build out your workflow, add actions by clicking the plus icon. Search for the desired service (like Office 365 Outlook), and authenticate when prompted. You can use dynamic content and built-in functions to manipulate data as needed.
For smooth performance, it's recommended to keep your workflow under 50 actions.
Testing and Running Your Workflow
Once your triggers and actions are configured, it's time to test your workflow to ensure everything works as intended.
Start by selecting Run from the designer toolbar to initiate a test. If your workflow includes a Request trigger, copy the generated callback URL and use a tool like curl, PowerShell, or the Microsoft Edge Network Console to send a test request. After running the test, review the Run History to check the data flow and troubleshoot any issues. Stateful workflows allow you to use the Resubmit option for further debugging.
Dive into the Run History for a detailed view of each step. Expand the Inputs and Outputs sections for every action to verify that data is moving correctly through the workflow.
The Trigger History is also a valuable tool, as it shows whether your trigger executed successfully, regardless of what happened with subsequent actions. If you're working on a live production workflow, remember to disable it before making changes to avoid accidental trigger executions.
Advanced Integration Scenarios
Once you've got the basics of Logic Apps down, it's time to dive into more complex integrations. These advanced techniques allow you to extend your workflows across enterprise systems, on-premises environments, and even custom APIs.
Connecting to Enterprise Applications
Azure Logic Apps includes specialized connectors for popular enterprise platforms like Dynamics 365, SharePoint, SAP, IBM MQ, and Salesforce. These connectors streamline authentication and data exchange, maintaining the same low-code experience across different systems.
For example, connectors for Azure Service Bus and SQL Server are designed to deliver high throughput and low latency. However, keep in mind that certain enterprise-grade connectors - such as those for SAP, IBM MQ, and IBM 3270 - are billed at a premium tier. Be sure to factor this into your cost planning.
Hybrid Integration with On-Premises Systems
If you need to connect to systems behind your firewall - like SQL Server, Oracle databases, or SharePoint Server - you'll need the On-Premises Data Gateway. This involves installing the gateway software on a local machine within your network and creating a corresponding gateway resource in Azure.
For those using Standard workflows, there's another option: direct virtual network integration. This method uses built-in service provider connectors to access on-premises resources via Azure virtual networks. It eliminates the need for a gateway, improving performance and simplifying setup.
Organizations with strict data residency or regulatory requirements can take it a step further. With Standard Logic Apps, you can deploy on-premises or in private clouds using Azure Arc-enabled Kubernetes clusters. In this setup, the runtime can operate disconnected from Azure for up to 24 hours while retaining data logs. This hybrid model ensures smooth automation workflows in even the most complex environments.
Custom API Connections
When you're working with systems that don’t have a prebuilt connector, you can create a custom connection. For Consumption workflows, this means building custom connectors using Swagger (OpenAPI) or SOAP definitions. For Standard workflows, you can use an extensibility model with Azure Functions, allowing your connector to run in the same process as the Logic Apps runtime for better performance.
To make your custom API compatible with Logic Apps, include an OpenAPI document. This ensures the Logic Apps designer can identify operations, parameters, and schemas, delivering the same low-code experience as prebuilt connectors. For long-running processes, consider implementing asynchronous patterns like HTTP 202 responses with location headers or webhook callbacks.
For security, always use managed identities for authentication instead of embedding credentials in your code. Store sensitive data like connection strings in Azure Key Vault. Also, since Logic Apps uses an "at-least-once" message delivery model, design your custom APIs to be idempotent, ensuring duplicate requests don’t lead to data inconsistencies.
These advanced integration strategies allow you to create workflows that are both powerful and scalable, making them ideal for enterprise-grade automation.
sbb-itb-79ce429
Monitoring and Improving Logic App Performance
Once your workflows are up and running, keeping an eye on their performance is crucial. Azure offers a range of monitoring tools to help you track execution, troubleshoot issues, and fine-tune efficiency.
Setting Up Log Analytics and Diagnostics
For Consumption Logic Apps, you can enable Log Analytics during setup or add a diagnostic setting later. Be sure to route Workflow runtime diagnostic events and AllMetrics to a Log Analytics workspace. In the case of Standard Logic Apps, configure diagnostics for Workflow Runtime Logs and AllMetrics as well. To dig deeper, connect your app to Application Insights and update the host.json file with Runtime.ApplicationInsightTelemetryVersion: "v2".
Telemetry data can be directed to various destinations based on your needs:
- Log Analytics workspaces: Ideal for querying and in-depth analysis.
- Azure Storage accounts: Suitable for long-term data storage.
- Azure Event Hubs: Perfect for real-time streaming to tools like Power BI.
Keep in mind, diagnostic data might take 10–30 minutes to show up in Log Analytics.
For custom tracking, you can add Tracked Properties to specific actions to log inputs or outputs. Using Custom Tracking IDs in triggers helps correlate events across parent and child workflows. To analyze your data, use Kusto Query Language (KQL). For Standard workflows, query the LogicAppWorkflowRuntime table, and for Consumption workflows, use the AzureDiagnostics table. This can help you identify exceptions, retries, and latency in executions.
Once diagnostics are set, you’ll have detailed execution data to pinpoint issues effectively.
Reviewing Trigger and Run History
The Run History feature provides a breakdown of what occurred during each workflow execution. Pay close attention to actions marked as "Succeeded with retries" - these indicate initial failures that were eventually resolved. While this might seem fine, it could hint at intermittent issues or unstable dependencies. Use the Workflow Job Execution Delay metric to measure the delay between job scheduling and execution. High delays often signal resource contention or scheduling bottlenecks.
The Trigger History section deserves separate attention. A "Skipped" status means the workflow wasn’t executed due to unmet conditions, which is normal. However, a "Failed" trigger suggests an endpoint issue that prevented the workflow from starting. If a trigger shows a "Running" status for longer than expected, it could mean your workflow is being throttled due to action limits or pricing plan restrictions.
Use the Correlation ID from run details to trace performance across nested workflows. This helps identify specific sub-processes causing delays. Additionally, set up Azure Monitor alerts for signals like "Workflow Triggers Failure Rate" or "Triggers Failed" to catch potential issues early.
Workflow Design Best Practices
After reviewing run history, apply design strategies to improve performance. The way you structure your workflows has a direct impact on efficiency. For instance:
- Use push triggers like Request or Webhook instead of polling triggers to minimize latency and reduce unnecessary checks.
- For high-demand workflows, consider deploying them on the Standard (single-tenant) plan. This avoids the "noisy neighbors" effect found in multitenant environments and ensures dedicated resources.
Group actions into scopes to organize workflows and enable structured error handling. Configure retry policies on actions to manage temporary failures automatically. Application Insights can help you query retryHistory to identify unstable dependencies. For better reliability, enable zone-redundancy to safeguard against infrastructure failures.
For debugging, the "Submit from this action" feature lets you rerun failed workflows starting from the point of failure, using the same inputs. This saves time compared to manually re-triggering workflows. Note that this feature works best for workflows with 40 or fewer actions. Lastly, monitor the Workflow Job Execution Duration metric to identify time-consuming actions and focus your optimization efforts there.
Deploying and Managing Logic Apps at Scale
Once you've fine-tuned and monitored your Logic Apps, the next step is ensuring their deployment and management across environments remain consistent and reliable.
Deploying Logic Apps across development, test, and production environments requires a standardized approach. Azure Resource Manager (ARM) templates simplify this process by allowing you to define your infrastructure as code. These JSON-based templates ensure repeatable and consistent deployments by maintaining an idempotent state - meaning every deployment produces the same outcome.
Using ARM Templates for Deployment
ARM templates are structured into four key sections, each playing a crucial role in deploying Logic Apps efficiently:
- Parameters: These hold values that vary by environment, such as connection strings or resource names.
- Variables: These store reusable values derived from parameters.
- Resources: This section defines the Logic App workflows and API connections.
- Outputs: These return specific values after deployment, like endpoint URLs.
To ensure flexibility, maintain a single core template file (e.g., logicapp.json) alongside multiple environment-specific parameter files (e.g., logicapp.dev.parameters.json). This setup allows you to deploy the same workflow definition across multiple stages without making changes to the core template.
When dealing with sensitive information like passwords or secrets, avoid hardcoding them directly into templates. Instead, use securestring or secureobject parameter types and store sensitive values in Azure Key Vault. These can then be referenced securely within your parameter files. For Consumption Logic Apps, you can use the LogicAppTemplate PowerShell module to extract existing workflows into templates. For Standard Logic Apps, Visual Studio Code offers tools for generating deployment scripts for infrastructure, continuous integration (CI), and continuous delivery (CD). API connections, being separate Azure resources, typically require deployment and authorization only once, allowing subsequent updates to use the already authorized connections.
Automating Deployments with DevOps Pipelines
For Standard Logic Apps, a three-tier pipeline setup ensures smooth deployment:
- Infrastructure: Deploy ARM templates to set up the required environment.
- CI: Build and generate artifacts.
- CD: Deploy the workflow definitions.
To securely authorize deployments, use Microsoft Entra service principals for Azure Resource Manager service connections. Visual Studio Code, with the Azure Logic Apps (Standard) extension, can automatically generate YAML pipeline files. Simply use the "Generate deployment scripts" option from the command palette.
Parameterizing connection references is a critical step. By doing so, workflows can adapt seamlessly across environments, eliminating the need for manual re-authorization during CI/CD runs and ensuring fully automated pipelines.
Security and Governance Best Practices
To strengthen your deployment strategy, integrate secure connector setups with system-assigned managed identities. Use Azure Policy to enforce secure and compliant deployments. For Standard Logic Apps, you'll need to explicitly add access policies to Azure connections, granting permissions to the Logic App's managed identity, since the runtime operates in your environment rather than a shared service.
Keep your ARM templates stored as Template Specs for standardized deployments. Before deploying, use the "what-if" operation to preview potential changes and run the ARM template tool kit (arm-ttk) to validate that templates align with Microsoft's guidelines. For Standard Logic Apps, separate infrastructure deployment (e.g., virtual networks, storage) from application code (e.g., workflows). This approach allows you to update business logic quickly without needing to reprovision the entire environment.
Conclusion
Azure Logic Apps makes integration straightforward at every stage. With its visual, serverless design, it simplifies connecting systems like Salesforce, SAP, Office 365, and on-premises databases - all without requiring extensive custom coding. The platform’s serverless nature removes infrastructure concerns, automatically scaling to meet demand, whether you're handling a few transactions or managing workflows for 65,000+ customers already using the service.
The platform offers flexibility to match your needs. Start with the Consumption plan for smaller tasks and move to the Standard plan for dedicated resources as your requirements grow. For strict compliance needs, hybrid deployment options allow you to run workflows on your own infrastructure while still benefiting from cloud features.
Modern businesses thrive on smart automation, and Azure Logic Apps is built to deliver. From AI-powered workflows and intelligent document processing to real-time adaptability, it supports advanced scenarios. Whether you're updating legacy systems, building B2B integrations with protocols like EDIFACT and X12, or creating custom API connections, Azure Logic Apps offers enterprise-grade security, backed by Microsoft's $1 billion annual security investment and 100+ compliance certifications.
To get started, explore prebuilt templates to quickly launch your automation efforts. Use Log Analytics to monitor performance and identify areas for improvement. Design idempotent workflows to handle duplicate messages, ensuring data integrity with Logic Apps’ "at-least-once" delivery. As your projects expand, deploy consistently across environments using ARM templates and DevOps pipelines.
Azure Logic Apps goes beyond system connections - it lets your team focus on what matters most: business logic. Whether you’re automating routine tasks or managing complex, multi-system processes, the platform delivers the speed, scalability, and reliability you need.
Ready to take the next step? AppStream Studio can guide you in leveraging Azure Logic Apps to drive innovation and transform your enterprise.
FAQs
How does Azure Logic Apps ensure security and compliance for sensitive data?
Azure Logic Apps prioritizes the protection of sensitive data with features designed to secure workflows and align with regulatory requirements. By integrating with Azure Active Directory, it ensures strong identity management while role-based access control (RBAC) limits access to only those users who are authorized to manage or execute logic apps. To further secure data, all information in transit is encrypted using TLS protocols, protecting it from unauthorized access or tampering.
On top of that, Azure Logic Apps adheres to Azure's stringent security standards, supporting compliance with regulations across industries like healthcare and finance. Tools such as managed identities, secure connectors, and data loss prevention (DLP) policies add additional layers of security, ensuring sensitive data is both protected and handled in compliance with organizational and regulatory demands.
What advantages does the Standard plan offer compared to the Consumption plan in Azure Logic Apps?
The Standard plan in Azure Logic Apps offers consistent pricing, improved performance, and more control over your workflows. Unlike the Consumption plan, it operates on dedicated resources, making it a solid option for use cases that demand steady performance and the ability to scale effectively.
On top of that, the Standard plan allows for local development and deployment, giving developers the freedom to test and manage workflows in a controlled setting before pushing them to production. This makes it especially appealing for businesses with intricate integration requirements or those looking for stronger solutions to automate processes.
How do I connect on-premises systems to Azure Logic Apps?
To link your on-premises systems with Azure Logic Apps, you can rely on the On-premises Data Gateway. This tool acts as a secure bridge, allowing your local network to connect with Azure and enabling seamless data integration into cloud workflows.
Here’s a quick guide to setting it up:
- Install the Gateway: Download and install the On-premises Data Gateway on a machine within your network. Follow the installation steps provided during setup.
- Sign In and Register: Use your Azure account to configure the gateway and register it with your Azure subscription.
- Create a Connection in Logic Apps: In Azure Logic Apps, establish a connection to your on-premises systems (like SQL Server or file systems) by selecting the gateway as the communication link.
After completing these steps, your Logic App workflows can securely access and interact with your on-premises data. This setup ensures smooth and secure integration between your local systems and Azure.