Azure Cost Governance: Automate Policy Enforcement
Cost management in Azure can be challenging, but automation simplifies the process. Azure Policy is a tool that helps you control cloud spend by enforcing rules like restricting high-cost resources, requiring cost-tracking tags, and auditing wasteful assets. This ensures compliance with business goals and regulations, while reducing manual oversight.
Key takeaways:
- Azure Policy automates cost governance by enforcing rules like tagging, resource restrictions, and location limits.
- Automation reduces errors and ensures consistent compliance across your Azure environment.
- Built-in policies include cost-saving measures like limiting VM sizes, auditing unused resources, and applying Azure Hybrid Benefit (saving up to 40% on Windows/SQL Server costs).
- Testing policies in audit mode prevents disruptions before enforcement.
- Policy as Code integrates cost governance into CI/CD pipelines for seamless updates.
Start small with essential policies, test thoroughly, and expand gradually to maintain effective cost control and compliance.
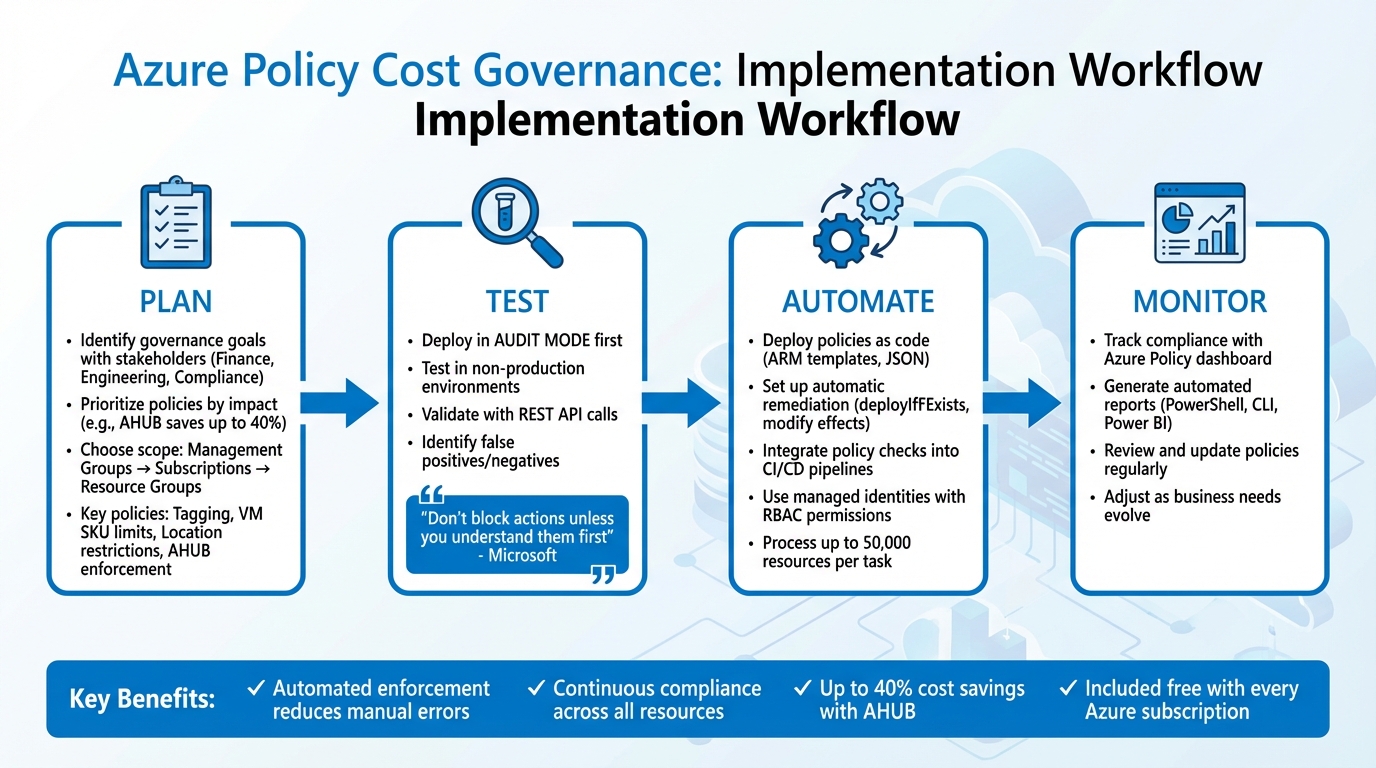
Azure Policy Cost Governance Implementation Workflow
How to Save Costs with Azure Policy! - Azure Policy Deep Dive

How Azure Policy Supports Cost Governance
Azure Policy helps you manage resources by checking them against business rules written in JSON. It continuously evaluates resources whenever they are created, updated, or during daily compliance checks. The best part? Azure Policy comes included with every Azure subscription at no extra cost. Let’s dive into how this works through its rules and assignments.
What Azure Policy Does
Azure Policy operates using two main components: policy definitions (the rules you set up) and policy assignments (applying those rules to specific scopes like subscriptions or resource groups). If a resource doesn’t meet the criteria you’ve defined, Azure Policy steps in with one of several effects:
- Deny: Blocks non-compliant resources, such as stopping the deployment of an expensive E-series VM when a D-series would do the job.
- Audit: Logs violations without halting deployment, like flagging unattached disks that rack up unnecessary charges.
- Modify: Automatically updates or adds resource properties, such as adding mandatory cost-center tags.
- DeployIfNotExists: Ensures essential resources are deployed alongside new infrastructure.
"Azure Policy is a tool that can help implement cost governance measures. With Azure Policy, you can define and enforce rules to control costs, monitor usage, and optimize your resources."
– Felipe Binotto, Cloud Solution Architect, Microsoft
Common Cost Control Policies
Azure Policy offers several built-in rules aimed at cost management. Here are a few examples:
- "Allowed Virtual Machine Size SKUs": Limits teams to appropriate hardware, avoiding overspending on overpowered machines.
- "Allowed Locations": Restricts deployments to specific regions, saving money on data transfer fees.
- Tagging Policies: Ensures every resource includes fields like “Department” or “CostCenter,” making chargeback reporting accurate and straightforward.
- Azure Hybrid Benefit (AHUB): Enforces cost-saving measures for Windows Server and SQL Server workloads, which can cut costs by up to 40%.
Audit policies are also key for identifying waste. For instance, they can flag unattached managed disks or unused public IP addresses that still generate charges. These policies highlight how automated governance can help control expenses while laying the groundwork for broader automation benefits.
Why Automation Matters
Manual resource checks are tedious and prone to mistakes. Azure Policy’s automation takes this burden off IT teams by ensuring continuous compliance. It evaluates resources during creation, updates, and daily compliance cycles, catching potential cost overruns before they snowball. For mid-sized teams managing sprawling Azure environments, this automation ensures consistency across hundreds - or even thousands - of resources without the need to expand the team.
Setting Up Your Cost Governance Policies
Planning cost governance starts with defining clear goals, understanding the scope, and developing a solid rollout strategy.
Identify Your Governance Goals
Bring together the right stakeholders - finance teams to address budget limits, engineering teams to assess resource needs, and compliance officers to ensure regulatory alignment. Governance is a collective effort involving platform teams, workload teams, and business stakeholders.
Evaluate the impact of potential policies to prioritize which ones to implement first. For example, enforcing Azure Hybrid Benefit (AHUB) can cut costs by up to 40% on Windows Server and SQL Server workloads. Similarly, auditing for unused resources, like unattached disks or public IP addresses, can eliminate unnecessary expenses. These measurable savings make it easier to decide where to start.
| Governance Category | Goal/Requirement | Policy Example |
|---|---|---|
| Cost Allocation | Identify spending by department | Enforce required tags on all resources |
| Budget Control | Avoid overspending on hardware | Restrict allowed Virtual Machine SKUs |
| Waste Reduction | Remove costs from unused resources | Audit unattached disks and public IPs |
| Compliance | Meet local data/cost requirements | Restrict deployments to "Allowed locations" |
| Efficiency | Optimize license use | Audit and enforce Azure Hybrid Benefit (AHUB) |
Start with a small set of essential policies rather than trying to address everything at once. Use blocklists instead of allowlists to keep options open while managing costs. For instance, blocking expensive E-series VMs in non-production environments allows teams to select appropriate SKUs without accidentally provisioning high-cost options.
Once you've defined your goals, apply policies at the right organizational level.
Apply Policies at the Right Level
Azure Policy uses a hierarchical model where policies assigned at higher levels automatically apply to all child subscriptions and resource groups. This setup allows for flexible and scalable governance.
- Management groups: Ideal for broad organizational rules, such as restricting deployments to specific Azure regions or mandating certain resource types.
- Subscriptions: Best for environment-specific rules, like limiting non-production environments to lower-cost storage tiers or smaller VM SKUs.
- Resource groups: Useful for workload-specific controls, such as applying project tags or tracking departmental costs.
This layered approach ensures consistent cost control across your organization. For example, strict rules can be applied at the management group level, while exceptions can be granted at the resource group level for specialized needs.
A practical method is to create policy definitions at a higher level and assign them to child levels for greater granularity. Even if you start with a single policy, bundling it into an initiative allows you to add related cost-control measures later without increasing the complexity of assignments.
After setting up policies, it’s essential to test them thoroughly before enforcement.
Test Policies Before Enforcement
Deploy policies in audit mode initially - don’t enforce deny effects in production without validation. This "monitor-first" approach helps you identify risks and refine governance strategies before moving to strict enforcement.
"Don't block actions unless you understand them first. For lower priority risk, start by monitoring compliance with cloud governance policies."
– Microsoft
Set the enforcementMode to disabled when assigning policies. This allows you to audit existing resources without blocking new deployments. It helps uncover which resources fail compliance checks and identifies false positives or negatives.
Begin testing in non-production environments, such as development subscriptions or specific resource groups. Validate the policy behavior using REST API calls to check edge cases, like missing resource properties. For policies with deployIfNotExists or modify effects, ensure remediation tasks complete successfully and resource properties update as expected. Once the policy performs as intended, gradually expand its scope to production environments, gathering feedback along the way.
sbb-itb-79ce429
Automate Enforcement and Fix Non-Compliance
Once you've completed testing, it's time to automate enforcement and remediation to ensure cost governance stays consistent. Automation allows you to deploy policies as code, address non-compliance automatically, and seamlessly integrate cost controls into your CI/CD workflows.
Deploy Policies with ARM Templates
You can deploy policies as code using Azure Resource Manager (ARM) templates written in JSON. Policies are defined as a resource type: Microsoft.Authorization/policyAssignments. By storing these templates in version control, you can easily update them through CI/CD pipelines and apply them to various scopes - whether at the Management Group level for organization-wide rules, at the Subscription level for environment-specific controls, or at the Resource Group level for workload-specific governance. For example, deploying a template at the Management Group level ensures cost controls are enforced across all subscriptions under that group.
To make templates reusable across departments, parameterize fields like policyDefinitionID and scope. Specify enforcement effects such as Deny to block non-compliant or high-cost resources, Audit to flag violations, or Modify to automatically resolve issues. Before deploying these templates, ensure the Microsoft.PolicyInsights resource provider is registered in your target subscription to enable compliance tracking.
Set Up Automatic Remediation
Automatic remediation works with policies that have deployIfNotExists or modify effects. This requires a managed identity - either system-assigned or user-assigned - with the appropriate RBAC permissions to make resource changes. For custom policies, include the roleDefinitionIds property to define the permissions the identity will need.
Remediation tasks can be triggered automatically during policy assignment or manually for existing resources. Each task can handle up to 50,000 resources, processing 10 at a time by default, with a maximum of 30 running in parallel. For example, a modify policy could automatically add missing cost center tags to resources, while a deployIfNotExists policy might deploy diagnostic settings to monitor expenses.
Make sure to assign only the permissions that the managed identity absolutely requires. If you're using the Azure Portal, roles are often assigned automatically. However, if you're deploying through SDKs or the CLI, you may need to grant permissions manually.
Add Policy Checks to CI/CD Pipelines
Integrating policy checks into your CI/CD pipelines is a proactive way to catch compliance issues before resources are deployed to production. Store policy definitions, initiatives, and assignments in version control to adopt a "Policy as Code" approach.
Set up your pipeline to automatically update policy definitions in Azure whenever changes are merged into the main branch. Tools like the Azure Pipelines Security and Compliance Assessment task or Azure Resource Graph queries can help evaluate compliance during deployments. You can also configure deployment gates that halt the pipeline if resources violate cost governance rules. This ensures non-compliant resources are never deployed, even when policies are initially in audit mode. Before enforcing policies strictly, test edge cases using REST API calls to confirm everything works as expected.
Monitor and Maintain Compliance Over Time
Automation doesn’t stop once it’s set up. Keeping an eye on things over time is crucial to catching issues, addressing them, and adjusting policies as your business needs evolve. Thankfully, Azure’s built-in tools make this process much easier.
Track Compliance with the Azure Dashboard
After deploying policies and setting up automated fixes, the next step is continuous monitoring.
The Azure Policy compliance dashboard gives you a clear, aggregated view of your environment. It evaluates compliance in real time whenever resources are created, updated, or when policy assignments change. This means you can quickly identify issues like unauthorized VM SKUs or deployments in costly regions as soon as they happen.
You can also use the dashboard to track remediation efforts, whether they’re bulk fixes or automatic corrections for new resources. For deeper insights, connect Azure Policy data to Azure Resource Graph for exploring resource states, or link it to Microsoft Cost Management to understand how compliance issues are affecting your spending. This approach helps you pinpoint if non-compliance is driving unexpected costs.
Generate Automated Compliance Reports
Real-time tracking is great, but automated reports help you stay on top of governance regularly.
Manual reporting doesn’t scale well. Instead, use tools like Azure PowerShell or Azure CLI to retrieve compliance data programmatically and export it for regular reporting. At a minimum, you’ll need Reader access, but Resource Policy Contributor access is better for making adjustments.
Tailor these reports to fit the needs of different teams. Leadership teams benefit from high-level summaries that connect governance to business value and cost efficiency. FinOps teams, on the other hand, might need reports filtered by tags like cost centers or departments to manage chargebacks. For engineering teams, detailed, resource-specific views help them quickly identify and fix compliance issues. You can even export this data to Power BI to create visualizations and track trends over time.
Update Policies as Needs Change
As your business grows and changes, your policies need to keep up. Regular reviews ensure your cost governance rules stay relevant.
Over time, business goals shift, Azure services evolve, and regulations change. To keep up, schedule routine reviews of your policies. Azure’s recommended landing zone policies are updated periodically, so it’s a good idea to migrate from custom definitions to newer built-in options when available.
For managing policies, use ARM templates, Bicep, or Terraform. These tools allow you to treat policies as code, ensuring updates automatically trigger compliance checks. When introducing new rules, start with an audit effect to gauge their impact before moving to stricter enforcement options like deny or modify. To simplify management, group related cost policies into initiatives - this way, you can add new rules without creating extra assignments to oversee.
Next Steps
You've taken the first steps toward automating cost governance in Azure. Now, it’s all about building on that foundation in a thoughtful, phased manner. Start small and scale up gradually. A good way to begin is by using audit mode to understand the potential impact of your policies without interfering with deployments or existing automation.
"Start with an
auditorauditIfNotExistseffect instead of an enforcement (deny,modify,deployIfNotExists) effect to track how your policy definition affects the resources in your environment." – Microsoft
Leverage the compliance dashboard to review the results and discuss your governance strategy with your team. Once you’re confident that the policies align with your business goals, transition to enforcement effects like deny or modify. Monitor the initial outcomes carefully to ensure everything runs smoothly. Testing policies in a development environment first can help you catch and address false positives before they impact production.
After enforcement is in place, shift your focus to maintaining and refining your governance framework. For long-term success, manage your policies as code. Use version control for tracking changes and automate updates to keep policies current. Automating remediation tasks is another critical step - this ensures existing resources are brought into compliance while preventing new violations from slipping through the cracks.
Remember, governance isn’t a one-and-done effort. Make it a habit to review your policies regularly. Adjust them as your business evolves, Azure services change, or new regulations come into play. Start with a few essential policies, validate their effectiveness, and expand progressively. This approach helps you manage costs effectively without slowing down your teams.
Ready to take your Azure cost governance and modernization efforts further? Check out the resources and services available at AppStream Studio.
FAQs
How can Azure Policy help with automating cost governance?
Azure Policy streamlines cost management by automatically enforcing rules across your Azure setup. It ensures that resources adhere to guidelines, such as using approved SKUs, including mandatory tags for cost tracking, or limiting VM sizes. These policies can be applied broadly to management groups, subscriptions, or resource groups, ensuring all resources are assessed in real time.
With Azure Policy, any actions that don't comply with the rules can either be blocked outright or flagged for review. Additionally, built-in remediation tasks can address problems like missing tags or incorrect configurations automatically. By standardizing tagging practices and monitoring resource compliance, Azure Policy helps you maintain consistent and automated cost oversight, making it easier to manage your Azure expenses effectively and transparently.
What are the key Azure policies for managing costs effectively?
To keep Azure costs under control, you can put several smart policies in place that make tracking and managing expenses much easier:
- Use standardized naming conventions: This helps organize resources by project, team, or environment, making it simpler to monitor usage and identify areas for adjustment.
- Apply mandatory cost-related tags: Tags like
CostCenter,Project, orEnvensure every dollar spent is tied to the right team or project, improving accountability. - Enforce resource compliance restrictions: Limit the creation of services, SKUs, or regions to approved options that align with cost-saving strategies.
- Set budget thresholds with alerts: Get notified when spending nears a predefined limit, so teams can make adjustments before costs spiral.
- Establish spending guardrails: Define maximum limits for subscriptions or resource groups, and even automate actions like resizing or shutting down costly resources when needed.
By using tools like Azure Policy and Azure Cost Management, you can automate these policies, ensuring they’re consistently applied and helping you stay on top of your budget.
Why should you test Azure policies in audit mode first?
Testing policies in audit mode gives you the chance to see how they work without enforcing them right away. This approach helps you spot non-compliant resources and understand the policy's behavior without causing disruptions to your environment.
Using audit mode first allows you to adjust policies based on actual results, cutting down on false positives and avoiding unnecessary changes. It also enables a step-by-step introduction to governance, making the rollout smoother and reducing risks before switching to full enforcement.