6 Steps to Assess Workloads for Azure Migration
Migrating to Azure without proper preparation can lead to delays, cost overruns, and performance issues. To ensure a smooth transition, follow these six steps to assess your workloads effectively:
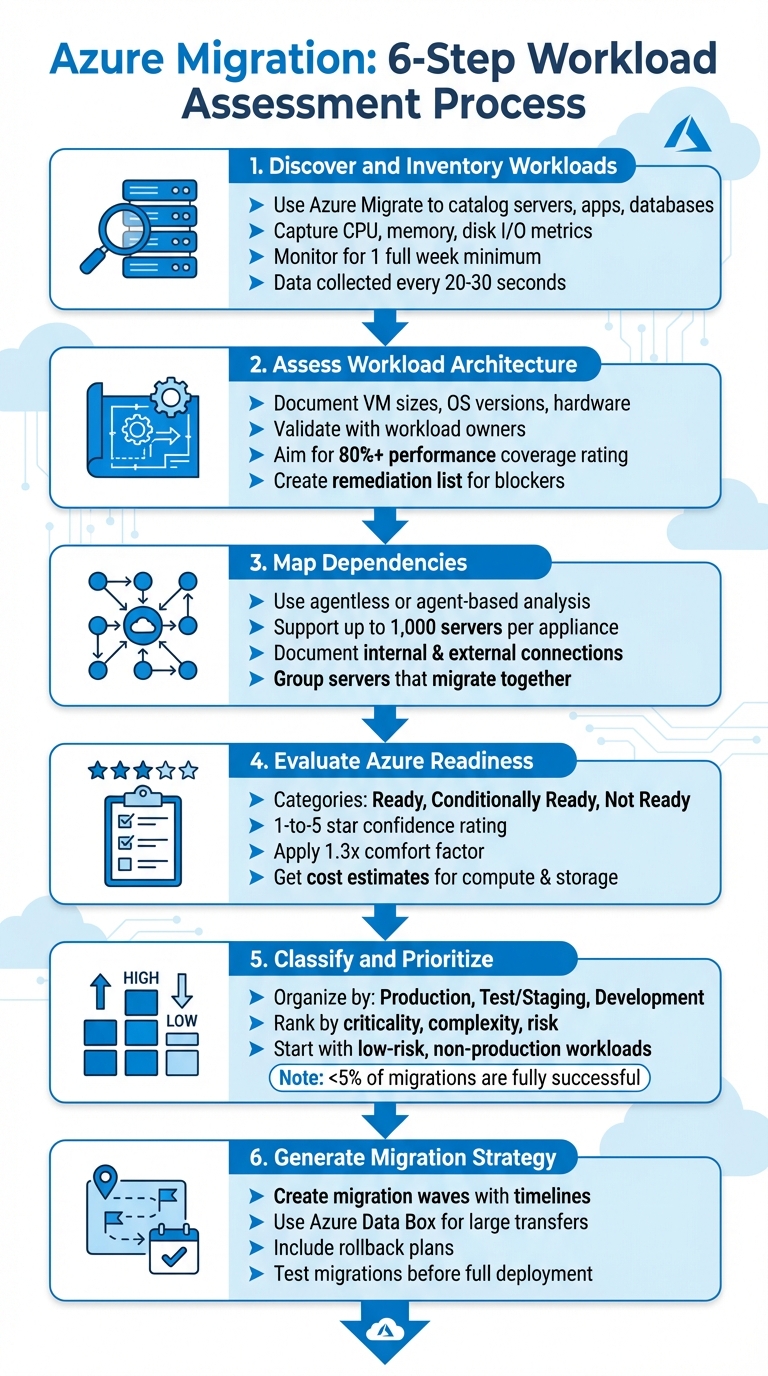
- Discover and Inventory Workloads: Use Azure Migrate to catalog servers, applications, and databases, while capturing performance metrics like CPU, memory, and disk I/O.
- Assess Workload Architecture: Document VM sizes, OS versions, and hardware details. Validate findings with workload owners to identify dependencies and risks.
- Map Dependencies: Use Azure Migrate's tools to identify connections within and outside workloads, ensuring critical systems migrate together.
- Evaluate Azure Readiness: Categorize workloads as "Ready", "Conditionally Ready", or "Not Ready" and right-size resources based on performance data.
- Classify and Prioritize Workloads: Organize by environment type (e.g., Production, Test) and prioritize based on business criticality, complexity, and risk.
- Generate a Migration Strategy: Create a roadmap with migration waves, timelines, and fallback plans. Use tools like Azure Data Box for large-scale data transfers.
This process minimizes risks, optimizes costs, and ensures workloads align with Azure's capabilities. By addressing dependencies, readiness, and prioritization, you can streamline the migration journey and reduce disruptions.
6 Steps to Assess Workloads for Azure Migration
Assess your applications for migration or modernization with Azure Migrate
Step 1: Discover and Inventory Workloads
Azure Migrate simplifies the process of discovering and cataloging your infrastructure. It automatically scans VMware, Hyper-V, physical servers, and certain cloud workloads, ensuring you account for every server, application, database, and virtual machine in your environment. This automated discovery lays the groundwork for accurate performance assessments and migration planning.
The tool collects metadata such as disk and network interface details, installed applications, roles, features, and performance data. You can export this inventory to pinpoint applications and SQL Server instances across your setup. For environments with strict security policies that prevent automated discovery, you can manually log assets using the Azure Migrate CSV template.
Capturing performance metrics is just as critical as cataloging assets. The appliance monitors key metrics like CPU usage, memory utilization, disk IOPS, disk throughput (measured in MB/s), and network throughput for each adapter. It collects real-time performance data at intervals - every 20 seconds for VMware, 30 seconds for Hyper-V, and 5 minutes for physical servers - and aggregates this data into 10-minute intervals (or 5 minutes for physical servers), recording peak values.
To ensure a thorough assessment, aim to profile your environment for at least one full week. This timeframe captures daily and weekly usage trends, including peak activity periods that shorter monitoring windows might miss. A complete profile increases the reliability of your migration planning and can help achieve a five-star assessment rating.
Lastly, complement automated discovery by consulting with workload owners. These conversations can uncover undocumented dependencies or informal integrations that automated tools might not detect. Keep your inventory up to date, especially after hardware changes, to maintain its accuracy. This comprehensive approach ensures you're ready for detailed workload analysis.
Step 2: Assess Workload Architecture and Components
After cataloging your assets, the next move is to analyze their architecture. While Azure Migrate provides baseline metadata, you'll need to dig deeper into the architectural specifics that will influence your migration approach. This includes documenting details like VM sizes, CPU cores, RAM, storage types (SSD or HDD), capacity, and any specialized hardware such as GPUs. Don't forget to include the OS type and version to flag any components that might not be supported. Creating a clear picture of these elements helps identify interactions and potential roadblocks early on.
While automated tools handle much of the data collection, some details may still require manual checks. For instance, tools can generate architecture diagrams based on discovered data, offering a visual starting point. If needed, you can enhance these visuals using Azure icons or templates from the Azure Architecture Center. These diagrams are crucial for understanding how components interact and for spotting migration risks before they escalate into problems.
Engage workload owners to validate findings and uncover hidden dependencies. Schedule review sessions with subject matter experts to verify automated results and identify undocumented connections or outdated configurations. Azure Migrate assigns a performance coverage rating (0% to 100%) to indicate the reliability of its sizing recommendations. If the rating is under 80%, allow at least another day of data collection before finalizing your analysis.
Incorporate security and licensing details into your documentation. Record service accounts, hard-coded credentials, encryption methods (both at rest and in transit), and existing firewall rules to ensure they are properly replicated or adjusted in Azure. Additionally, document software licensing to determine eligibility for the Azure Hybrid Benefit, which can help cut migration costs. Store all documentation - including diagrams, component lists, and configurations - in tools like Microsoft Visio, spreadsheets, or Azure DevOps wikis to streamline collaboration.
Develop a remediation list to address compatibility issues. Highlight unsupported OS versions or other concerns and classify them as either "blockers" that must be resolved before migration or "post-migration" tasks that can be tackled later. This prioritization keeps your project organized and helps avoid unexpected delays.
Step 3: Map Dependencies
After understanding your workload architecture, the next step is figuring out how all the pieces connect. Dependencies show which components need to migrate together and highlight critical external systems. Azure Migrate provides two ways to map these connections: agentless analysis and agent-based analysis. The agentless approach captures TCP connection data automatically for up to 1,000 servers discovered by each Azure Migrate appliance. It polls data every five minutes and sends processed results every six hours, giving you a baseline view of your system's dependencies. If you need deeper insights - like connection counts, latency, or data transfer - agent-based analysis is the way to go. This initial mapping lays the groundwork for validation with workload experts.
Automated tools like network monitoring and application performance monitoring (APM) can uncover runtime connections, helping you group components for a smooth migration. However, these tools might miss less obvious integrations.
To fill in the gaps, organize workshops with workload owners. These sessions help confirm the data from automated tools and uncover hidden dependencies, such as APIs, messaging systems, ETL processes, shared databases, or authentication methods. It's important to document both internal connections (within workload components) and external dependencies (like SaaS platforms, partner APIs, or third-party data pipelines). This thorough documentation reduces the risk of integration issues after migration. For each workload, identify both the business owner and the IT owner to ensure every perspective is considered.
Centralize all dependency information - whether in Azure DevOps wikis, spreadsheets, or other tools - to make collaboration easier. Include technical details like data exchange patterns, SLAs, and connectivity needs. Azure Migrate's visualization tools can also help by tagging servers and grouping them based on their dependencies. This organization ensures that migration risks are minimized and aligns with your broader Azure goals.
Finally, use the dependency mapping to create reliable groups of servers that should migrate together. This approach helps prevent outages by ensuring no critical components are left behind during the migration.
sbb-itb-79ce429
Step 4: Evaluate Azure Readiness and Right-Sizing
After mapping dependencies, the next step is to dive into Azure Migrate's assessment. This tool categorizes servers into four groups: Ready for Azure, Conditionally Ready, Not Ready, or Readiness Unknown. These classifications make it easier to identify which workloads can move to Azure immediately and which ones need adjustments before migration.
For sizing, you have two main options: performance-based sizing or as-is on-premises sizing. Performance-based sizing considers CPU, memory, disk IOPS, and throughput, typically using the 95th or 99th percentile for accuracy. This approach is ideal for optimizing resources, while as-is sizing works best for straightforward lift-and-shift migrations. To ensure reliable data, run performance-based assessments after 24 hours of discovery, aiming for at least 80% coverage.
Each assessment includes a 1-to-5-star Confidence Rating, which reflects the reliability of the collected data. To account for potential growth or performance spikes, apply a 1.3x comfort factor. For servers marked as Conditionally Ready or Not Ready, review the suggested remediation steps to address any issues. This rating helps you prioritize which workloads to address first.
With the sizing recommendations in hand, you can explore different migration strategies. These include PaaS, lift-and-shift to virtual machines (VMs), or lift-and-shift to Azure VMware Solution. The assessment also provides cost estimates for compute, storage, and licensing. To refine these estimates, consider applying Azure Hybrid Benefit and Reserved Instances, and adjust them based on VM uptime.
Keep in mind that assessments are static snapshots. If you make changes to your environment - like modifying disk sizes, upgrading RAM, or updating operating systems - be sure to refresh the assessment. Focus on workloads that are Ready for Azure and those running on systems nearing end-of-support, such as Windows Server 2008 R2. This prioritization helps you build early momentum while addressing security concerns. These steps are crucial for making well-informed migration decisions.
Step 5: Classify and Prioritize Workloads
Once you've assessed Azure readiness and right-sized your resources, the next step is to classify and prioritize workloads for migration. Start by organizing workloads based on their environment type - Production, Test/Staging, or Development. Each serves a different purpose, and their migration order matters. Production systems, which demand high availability and stringent security, should generally be migrated later in the process. Test and staging environments, closely mirroring production systems, are perfect for pilot migrations to validate your architecture. Development workloads, being lower risk, are excellent for quick wins and early momentum.
After classification, rank workloads by factors such as business criticality, technical complexity, and risk levels. Consider the potential business impact, any technical challenges (like legacy components or specialized hardware), and compliance risks tied to regulations such as GDPR, HIPAA, or SOX. Dependency mapping is another crucial step - group systems with strong interdependencies to migrate them together, reducing the risk of disruptions.
Your Azure readiness ratings from the previous step will also come in handy here. Identify low-risk workloads that are "Ready for Azure" with minimal modifications. Prioritize these for early migration, especially if they include systems running end-of-support operating systems like Windows Server 2008, which benefits from free extended security updates in Azure. Non-production workloads are ideal starting points - they allow your team to gain experience and confidence before handling more complex, high-risk systems.
As you plan, document operational constraints such as maintenance windows, blackout periods, and uptime requirements. This ensures your migration schedule aligns with business needs and avoids unnecessary disruptions. Collaboration is key - validate your migration order with both business and IT stakeholders. Additionally, maintain a detailed risk register to track technical, operational, and organizational risks throughout the process.
It's worth noting that cloud migrations are challenging. Research indicates that fewer than 5% of migrations are fully successful, and over half exceed budgets or face delays due to poor planning. A structured, well-thought-out approach can significantly improve your chances of success.
Step 6: Generate a Migration Strategy and Report
Now that your workloads are classified and prioritized, it's time to pull everything together into a migration roadmap. This roadmap will outline the steps needed for a smooth migration, organizing workloads into waves based on their complexity, urgency, and dependencies. Start with low-risk, non-production workloads to help your team gain confidence before moving on to critical systems. Assign timelines, designate owners, and define success criteria for each wave. This structured approach ensures the migration process stays on track and secure.
In your migration report, categorize workloads as "Ready," "Conditionally Ready," or "Not Ready," and clearly define the migration path for each. For secure and fast data transfers, use ExpressRoute; alternatively, VPNs can be a solid option. For large-scale data transfers, Azure Data Box is a reliable choice. Depending on the system's importance, decide between a downtime migration (suitable for non-critical systems) or near-zero downtime migration using continuous replication for workloads with strict SLAs. Once the migration path is clear, ensure your environment is fully prepared to support these strategies.
Set up your Azure landing zone with proper configurations, including security groups, access policies, and identity management. Use migration tools that support continuous replication to minimize downtime. Before diving into the full migration, run a test migration. This will help you estimate data transfer times, identify potential blockers, and refine the timing of your maintenance windows. These trial runs are critical for avoiding unexpected issues during the actual migration.
Your roadmap should also include a rollback plan. Define clear criteria for what constitutes a failed deployment, such as performance issues or unmet success metrics. This will help guide automated rollback steps within your CI/CD pipelines, minimizing disruptions if problems arise. Maintain a risk register to document technical and operational challenges. And don’t forget to recalculate assessments if there are changes to your on-premises server properties - these assessments are snapshots in time and can quickly become outdated.
For faster and more efficient Azure migrations, tools like AppStream Studio can be a game-changer. Their senior engineering teams specialize in Azure cloud modernization and deliver production-grade results in industries like financial services and healthcare. With one accountable team, they ensure secure and auditable migrations tailored for Microsoft environments.
Conclusion
Evaluating workloads is a critical step for a smooth Azure migration. By following these six steps, you gain a clear picture of your environment's components, dependencies, and requirements. Leveraging automated discovery reduces the risk of human error, performance-based right-sizing helps control costs, and early identification of potential blockers minimizes migration risks. Mapping dependencies and prioritizing workloads based on their importance to the business ensures your migration strategy aligns with organizational goals while keeping service disruptions to a minimum.
The assessment process provides accurate data to allocate resources effectively. Classifying workloads as "Ready", "Conditionally Ready", or "Not Ready" creates a clear migration plan, allowing you to sequence waves efficiently and achieve quick wins. This approach also ensures that security and compliance standards remain intact throughout the process.
For industries like financial services or healthcare, where regulatory compliance is non-negotiable, these insights are especially valuable. Adhering to mandates like GDPR, HIPAA, and SOX requires careful attention to data handling, encryption, and security configurations. Documenting these processes and replicating secure setups in Azure ensures compliance is maintained from the very start.
AppStream Studio specializes in helping mid-market organizations execute secure, compliant Azure migrations. Their expert engineering teams deliver production-ready Azure solutions tailored for Microsoft environments. Whether supporting financial services or private equity portfolios, AppStream Studio replaces fragmented vendor models with measurable results, offering faster delivery and lower costs per feature - all while meeting strict compliance requirements.
FAQs
What are the main advantages of using Azure Migrate for discovering workloads?
Azure Migrate makes it easier to discover and assess your workloads by providing tools to evaluate how ready they are for Azure, determine the right resource sizes, and estimate the costs of migration. It also offers customized strategies to help ensure a smooth and efficient move to the cloud.
By simplifying workload analysis and planning, Azure Migrate helps organizations save time, minimize risks, and make smarter decisions for a successful transition to Azure.
What’s the best way to classify workloads before migrating to Azure?
To prepare for a smooth migration to Azure, start by carefully reviewing your current workload inventory. This means identifying all your applications, servers, and their dependencies. Understanding how these elements connect and operate is key to determining the specific requirements for each workload.
Once you’ve mapped out your inventory, take a closer look at each workload’s performance, configuration, and compliance needs. This evaluation will help you decide the best migration approach - whether it’s lift-and-shift, re-platforming, or refactoring. Tools like Azure Migrate can simplify this process by assessing readiness, estimating costs, and highlighting potential migration challenges.
Prioritize workloads based on their importance to your business and how technically feasible their migration will be. Doing this ensures you allocate resources effectively and avoid unnecessary risks. Proper classification upfront not only minimizes complications but also lays a solid foundation for a successful Azure migration.
How can I reduce downtime during an Azure migration?
Minimizing downtime during an Azure migration takes careful preparation and smart strategies. Start by assessing your workloads in detail - this means documenting configurations, security settings, and dependencies. A clear understanding of these factors can help you spot potential challenges early, making the transition smoother.
Adopt a phased migration approach. By moving workloads in smaller, manageable steps, you can test and validate each phase before moving forward. This method reduces risks and allows you to tackle issues as they arise. Setting up separate Azure environments for development, testing, and production ensures consistency and reliability throughout the process.
Take advantage of tools like Azure Migrate to simplify the migration process. These tools can automate tasks like validation and security checks, saving time and reducing errors. Additionally, establish performance benchmarks before you begin. This helps you identify and address bottlenecks proactively.
With thorough planning, phased execution, and the right tools, you can minimize downtime and make your Azure migration as seamless as possible.